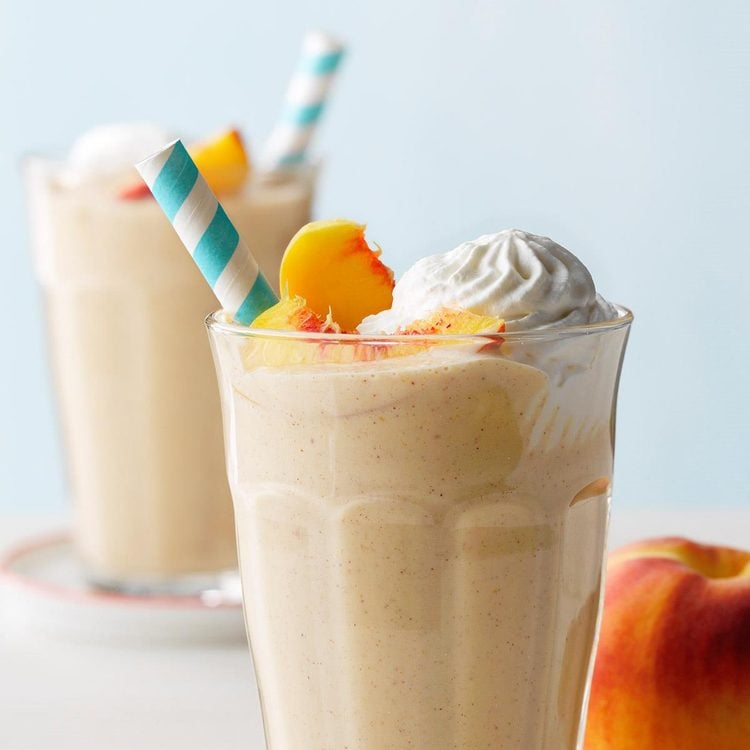
Tag: Homemade

Gnocchi-Leek Soup With Greens

Gnocchi-Leek Soup With Greens

Gnocchi-Leek Soup With Greens is a cozy, comforting bowl that’s both hearty and fresh. Pillowy gnocchi simmer with tender leeks and vibrant greens in a flavorful broth, creating a satisfying soup that’s perfect for chilly days or a simple, nourishing meal. Ingredients ⅓ cup vegetable 

Raspberry Lemon Cheesecake Bars

Raspberry Lemon Cheesecake Bars

Raspberry Lemon Cheesecake Bars have the best creamy and fluffy texture and plenty of fresh raspberry and lemon flavor in every bite. It’s such a treat. Cheesecake Bars are one of the easiest cheesecakes you’ll make, and they keep well in the fridge and freezer, 

Turkey gravy

Turkey gravy

Turkey Gravy is rich, savory, and full of comforting flavor. Smooth and velvety, it’s the perfect finishing touch for roasted turkey, mashed potatoes, and holiday sides bringing everything together with a warm, homemade touch that makes any meal feel complete.

Prep:10 mins
Cook:1 hrs 15 mins
Serves 8

Ingredients

  • 2 onions , chopped
  • turkey neck (optional)
  • 5½ cups or 2.5 pints turkey or chicken broth
  • 3 tbsp all-purpose flour
  • 5 tbsp white wine or water

Method

  1. Put the onions in a large saucepan with the turkey neck, if using. Pour in the broth and simmer for 1 hr. Strain out the vegetables and turkey neck, then return the liquid to the pan. For a textured gravy, remove the turkey and, using a hand blender, blitz the onion into the broth until smooth.
  2. Mix the flour with the white wine or water, then mix this into the broth, stirring over the heat until thickened. Cool completely, then refrigerate. Will keep in the fridge for several days or frozen for one month. Defrost in the fridge overnight. Reheat in a pan until piping hot, then add the juices from a roasted  turkey and season to taste.
Kuymak – Turkish Cheese Fondue

Kuymak – Turkish Cheese Fondue

Kuymak – Turkish Cheese Fondue is a rich and comforting specialty from Turkey’s Black Sea region, especially popular in cities like Trabzon and Rize. Known for its stretchy, molten cheese and silky, buttery texture, it’s warm, indulgent, and deeply satisfying. Traditionally enjoyed with fresh bread 

Buttermilk Biscuits

Buttermilk Biscuits

These Buttermilk Biscuits bake up tall, flaky, and buttery with soft layers inside and golden tops. Easy to make from scratch and perfect for breakfast, dinner, or with sausage gravy. Prep 10minutes minutesCook 15minutes minutesTotal 25minutes minutes Ingredients Instructions  Equipment Notes Nutrition Information Serving: 1biscuitCalories: 281kcal (14%)Carbohydrates: 34g (11%)Protein: 6g (12%)Fat: 13g (20%)Saturated Fat: 8g (50%)Polyunsaturated Fat: 1gMonounsaturated Fat: 3gTrans Fat: 0.5gCholesterol: 48mg (16%)Sodium: 421mg (18%)Potassium: 201mg (6%)Fiber: 1g (4%)Sugar: 2g (2%)Vitamin A: 432IU (9%)Calcium: 95mg (10%)Iron: 2mg (11%)

Strawberry Shortcake Roll

Strawberry Shortcake Roll

Strawberry Shortcake Roll is a light, airy dessert that brings a fresh twist to a classic favorite. Soft sponge cake is rolled around sweet cream and juicy strawberries, creating a beautiful, sliceable treat that’s perfect for spring gatherings, celebrations, or an elegant finish to any meal.

Recipe information

  • Total Time4 hours
  • Yield8 servings

Ingredients

Cake

6 large eggs, separated

Zest of 1 small lemon

½ cup (100g) sugar

1 tsp. Diamond Crystal or ½ tsp. Morton kosher salt

½ tsp. cream of tartar

⅓ cup whole or low-fat milk

¼ cup vegetable oil

1 cup (115 g) bleached cake flour

Whipped Cream and Assembly

¼ cup (50 g) sugar

2 Tbsp. instant vanilla pudding mix

2 tsp. vanilla bean paste or vanilla extract

½ tsp. Diamond Crystal or ¼ tsp. Morton kosher salt

2 cups heavy cream, divided

1 lb. fresh strawberries, hulled

Preparation

Step 1

Place a rack in middle of oven and preheat to 350°. Line a 18×13″ rimmed baking sheet with parchment paper (do not grease pan or parchment). Using an electric mixer on medium speed, beat 6 large egg whites, zest of 1 small lemon, ½ cup (100 g) sugar, 1 tsp. Diamond Crystal or ½ tsp. Morton kosher salt, and ½ tsp. cream of tartar in a medium bowl until sugar is dissolved, egg whites are glossy, and medium-stiff peaks form, 6–9 minutes. (Or, beat on medium speed in the bowl of a stand mixer fitted with the whisk attachment.)

Step 2

Place 6 large egg yolks in a large bowl. Whisk in ⅓ cup whole or low-fat milk and ¼ cup vegetable oil. Sift 1 cup (115 g) bleached cake flour over; vigorously whisk until smooth. Add one fourth of meringue and mix until incorporated. Add remaining meringue in 3 batches, gently folding with a rubber spatula after each addition until only a few streaks of meringue remain (err on the side of undermixing to keep the cake batter billowy).

Step 3

Scrape batter into prepared baking sheet and, using a medium offset spatula, gently spread to edges, smoothing surface. Bake cake until top springs back when gently pressed, 20–25 minutes (cake may start to shrink from sides of pan). Let cake cool in pan, 30–40 minutes.

Whipped Cream and Assembly

Step 4

Stir ¼ cup (50 g) sugar, 2 Tbsp. instant vanilla pudding mix, 2 tsp. vanilla bean paste or vanilla extract, ½ tsp. Diamond Crystal or ¼ tsp. Morton kosher salt, and ¼ cup heavy cream in a large bowl until pudding mix is dissolved and mixture is smooth. Using an electric mixer on medium-high speed, beat in remaining 1¾ cups heavy cream until medium-firm peaks form, about 4 minutes.

Step 5

Set 4–5 nice fresh strawberries aside from 1 lb. fresh strawberries, hulled, for decorating the final cake; cut remaining berries into ½” pieces.

Step 6

Run a small offset spatula along edges of pan to release cake. Place a clean sheet of parchment paper (the same size as the cake) on top of cake and, holding pan and parchment together, flip over in one swift motion to invert cake onto parchment. Place on a surface; remove baking sheet. Carefully peel away parchment from bottom of cake (start from a long side where it might be embedded in the cake and pull gently to avoid tearing the cake); discard. Using a paring knife, trim edges of cake on all 4 sides; discard (or eat!).

Step 7

Transfer 1½ cups whipped cream to an airtight container and chill until ready to serve cake. Dollop remaining whipped cream on top of cake. Using small offset spatula, smooth into an even layer, working all the way to edges. Evenly scatter chopped strawberries over. Gently push into cream with small offset spatula. Starting from a short end and using parchment to help shape, roll up cake (don’t worry if some filling gets squeezed out on the sides).

Step 8

Transfer cake to a platter and arrange seam side down. Cover loosely with plastic wrap and chill until filling is set and cake is cold, at least 2 hours and up to 1 day.

Step 9

Using a serrated knife, trim ¼”–½” off both ends of cake; discard (or eat!). Transfer reserved whipped cream to a pastry bag fitted with a very large tip (such as Ateco 789); pipe on top of cake (or, simply spread it on with medium offset spatula). Halve and/or quarter reserved strawberries; arrange on top as desired.

Tips:

Some tips to ensure roll cake success:

THE CAKE: Cream of tartar prevents the egg whites from becoming dry and overwhipped, ensuring a tender, even-crumbed sponge.

THE FILLING: A few spoonfuls of instant vanilla pudding mix turn a pint of heavy cream into a pillowy but stable whip, with a custardy density you can’t quite capture without its inclusion.

THE ROLLING: For the plumpest, roundest shape, think of the parchment like a corset, pulling tightly around the cake as you roll.

THE FINISH: To make a swirly stripe on top like we did, use an oversized basket weave tip such as an Ateco 789 (sometimes called a cake icer tip).

THE BERRIES: Look for deeply red, fully ripe strawberries with no white around the leaves. If you can’t find promising ones, use fresh raspberries instead; they tend to be more consistent and are a better choice here than mediocre strawberries.

Cabbage Chicken Soup

Cabbage Chicken Soup

This cabbage chicken soup is light, healthy, and actually filling. Low calorie, high in protein, and full of flavor, it’s perfect for weight loss. Prep Time:15minutes minsCook Time:35minutes minsServings:6 servings Ingredients SEASONING: SOUP: Instructions  Don’t move the chicken too much at the start. Let it sit so it 

Broccoli Cheddar Soup

Broccoli Cheddar Soup

THE BEST broccoli cheese soup there ever was! So creamy, so cheesy. Perfect for those busy weeknights + picky eaters! Prep: 15minutes minutesCook: 45minutes minutesYield: 6 servings  Ingredients Instructions

Classic Cheesecake

Classic Cheesecake

Classic Cheesecake is rich, creamy, and perfectly smooth a timeless dessert that never goes out of style. With a buttery crust and a velvety filling, it’s ideal for celebrations, special occasions, or anytime a simple yet indulgent treat is needed.

Prep Time: 45 minutes
Cook Time: 1 hour
Total Time: 7 hours, 45 minutes (includes chilling)

Ingredients

Graham Cracker Crust

  • 1 and 1/2 cups (180g) graham cracker crumbs (about 12 full-sheet graham crackers)
  • 1/4 cup (50g) granulated sugar
  • 5 Tablespoons (71g) unsalted butter, melted

Cheesecake

  • 32 ounces (904g) full-fat brick cream cheese, softened to room temperature
  • 1 cup (200g) granulated sugar
  • 1 cup (240g) full-fat sour cream, at room temperature
  • 1 teaspoon pure vanilla extract
  • 2 teaspoons fresh lemon juice (optional, but recommended)
  • 3 large eggs, at room temperature

Instructions

  1. Adjust the oven rack to the lower-middle position and preheat oven to 350°F (177°C).
  2. Make the crust: If you’re starting out with full graham crackers, use a food processor or blender to grind them into fine crumbs. Pour into a medium bowl and stir in the sugar until combined, and then stir in the melted butter. Mixture will be sandy. Try to smash/break up any large chunks. Pour into an ungreased 9-inch or 10-inch springform pan. With medium pressure using your hand, pat the crumbs down into the bottom and partly up the sides to make a compact crust. Do not pack down with heavy force because that makes the crust too hard. Simply pat down until the mixture is no longer crumby/crumbly (you can use the flat bottom of a small measuring cup to help smooth it out if needed). Bake for 10 minutes. Remove from the oven and set aside while you prepare the filling.
  3. Make the filling: In a large bowl using a handheld or stand mixer fitted with a paddle attachment, beat the cream cheese and granulated sugar together on medium-high speed until the mixture is smooth and creamy, about 2 minutes. Add the sour cream, vanilla extract, and lemon juice and beat until fully combined. With the mixer on medium speed, add the eggs one at a time, beating after each addition until just combined. Stop the mixer as soon as the final egg is fully incorporated into the batter; over-mixing can cause the cheesecake to deflate. You will have nearly 6 cups of batter.
  4. Prepare the simple water bath (see Note): (If needed for extra visuals, see How to Make a Cheesecake Water Bath; the visual guide and video will assist you in this step.) Boil a kettle/pot of water. You need 1 inch of water in your roasting pan for the water bath, so make sure you boil enough. I use an entire kettle of hot water. As the water is heating up, wrap 1 or 2 sheets of heavy-duty aluminum foil around the springform pan—be careful if it’s still warm from baking the crust! Place the wrapped springform pan inside of a large roasting pan. Pour the cheesecake batter on top of the crust. Use a spatula to smooth it into an even layer. Carefully pour the hot water inside of the pan and place in the oven. (Or you can place the roasting pan in the oven first, then pour the hot water in—whichever is easier for you.)
  5. Bake the cheesecake for 55–70 minutes or until the center is almost set. If you notice the cheesecake browning on top, tent it with aluminum foil halfway through baking. When it’s done, the center of the cheesecake should still slightly wobble if you gently tap or shake the pan. Turn the oven off and open the oven door slightly. With the door ajar, let the cheesecake sit in the oven in the water bath as it cools down for 1 hour. After 1 hour, remove from the oven and water bath, discard the foil, and place the springform pan on a cooling rack to cool completely at room temperature. When it has cooled, cover and refrigerate the cheesecake for at least 4 hours or up to 2 days.
  6. Run a knife around the edges of the springform pan to help loosen the cheesecake, then remove the outer rim. Using a sharp knife, cut into slices for serving. For neat slices, wipe the knife clean and dip it into warm water between each slice.
  7. Serve cheesecake with desired toppings (see Note). Cover and store leftover cheesecake in the refrigerator for up to 4 days.

Notes

  1. Make-Ahead Instructions: This cheesecake can be made the day before. It has to chill for quite some time before serving. See step 5. Another way to make this cheesecake ahead of time is to freeze it. Cheesecake can be frozen for up to 3 months. See instructions in blog post above.
  2. Special Tools (affiliate links): Food Processor | Glass Mixing Bowl | 9-inch Springform Pan or 10-inch Springform Pan | Electric Mixer (Handheld or Stand) | Roasting Pan | Silicone Spatula
  3. Oreo Cookie Crust: Feel free to replace the graham cracker crust with this Oreo cookie crust. Spray bottom of springform pan with nonstick spray, as Oreo cookie crusts tend to stick. Pre-bake the crust, just as you do with the graham cracker crust in step 2 above.
  4. Toppings: One of my favorite toppings for this cheesecake is raspberry sauce. Or you could top the baked and cooled cheesecake with salted caramel, lemon curd, strawberry topping, chocolate ganache, red wine chocolate ganache, fresh fruit, or whipped cream. The topping from my pecan pie cheesecake is also an option! 
  5. Alternate Water Bath Method: This method works as well, and you don’t have to bake the cheesecake IN water. Boil a kettle or pot of water. You need 1 inch of hot water in your roasting pan for the water bath, so make sure you boil enough. Place the cheesecake on the center oven rack of the preheated oven. Place a large metal baking or roasting pan (do not use glass—I usually use a 9×13-inch baking pan or an extra-large cast iron skillet) on the bottom rack. Pour boiling water into the empty pan, about 1 inch deep. Immediately close the oven door to trap the steam inside. This unique water bath adds steam to the oven without having the cheesecake sit inside the water itself. No need to wrap the springform pan in foil. See How to Make a Cheesecake Water Bath for more information.
  6. Room-Temperature Ingredients: Bring all cold ingredients to room temperature before beginning. Room-temperature ingredients combine quickly and evenly, so you won’t risk over-mixing. Also, beating cold ingredients together will result in a chunky cheesecake batter, hardly the way you want to begin!
  7. Non-US Readers: Don’t have graham crackers where you live? Use 200g ground digestive biscuit crumbs (about 2 cups; 13–14 biscuits), 1/3 cup (67g) granulated sugar, and 6 Tablespoons (85g) melted butter. Pre-bake the crust for a bit longer, about 12–14 minutes. And from what I understand, spreadable cream cheese sold in a tub in countries outside of the US is a little different from the spreadable cream cheese in the US. It’s thicker, sturdier, and more solid and should be OK for this recipe. I have no experience with it, but this is what I’ve heard from other non-US readers.
Hot Cross Muffins

Hot Cross Muffins

Hot Cross Muffins are a sweet, spiced treat inspired by the classic Easter favorite. Soft and tender with a hint of cinnamon and warm spices, they’re perfect for breakfast, brunch, or an afternoon snack, offering all the comforting flavors of the season in a convenient,