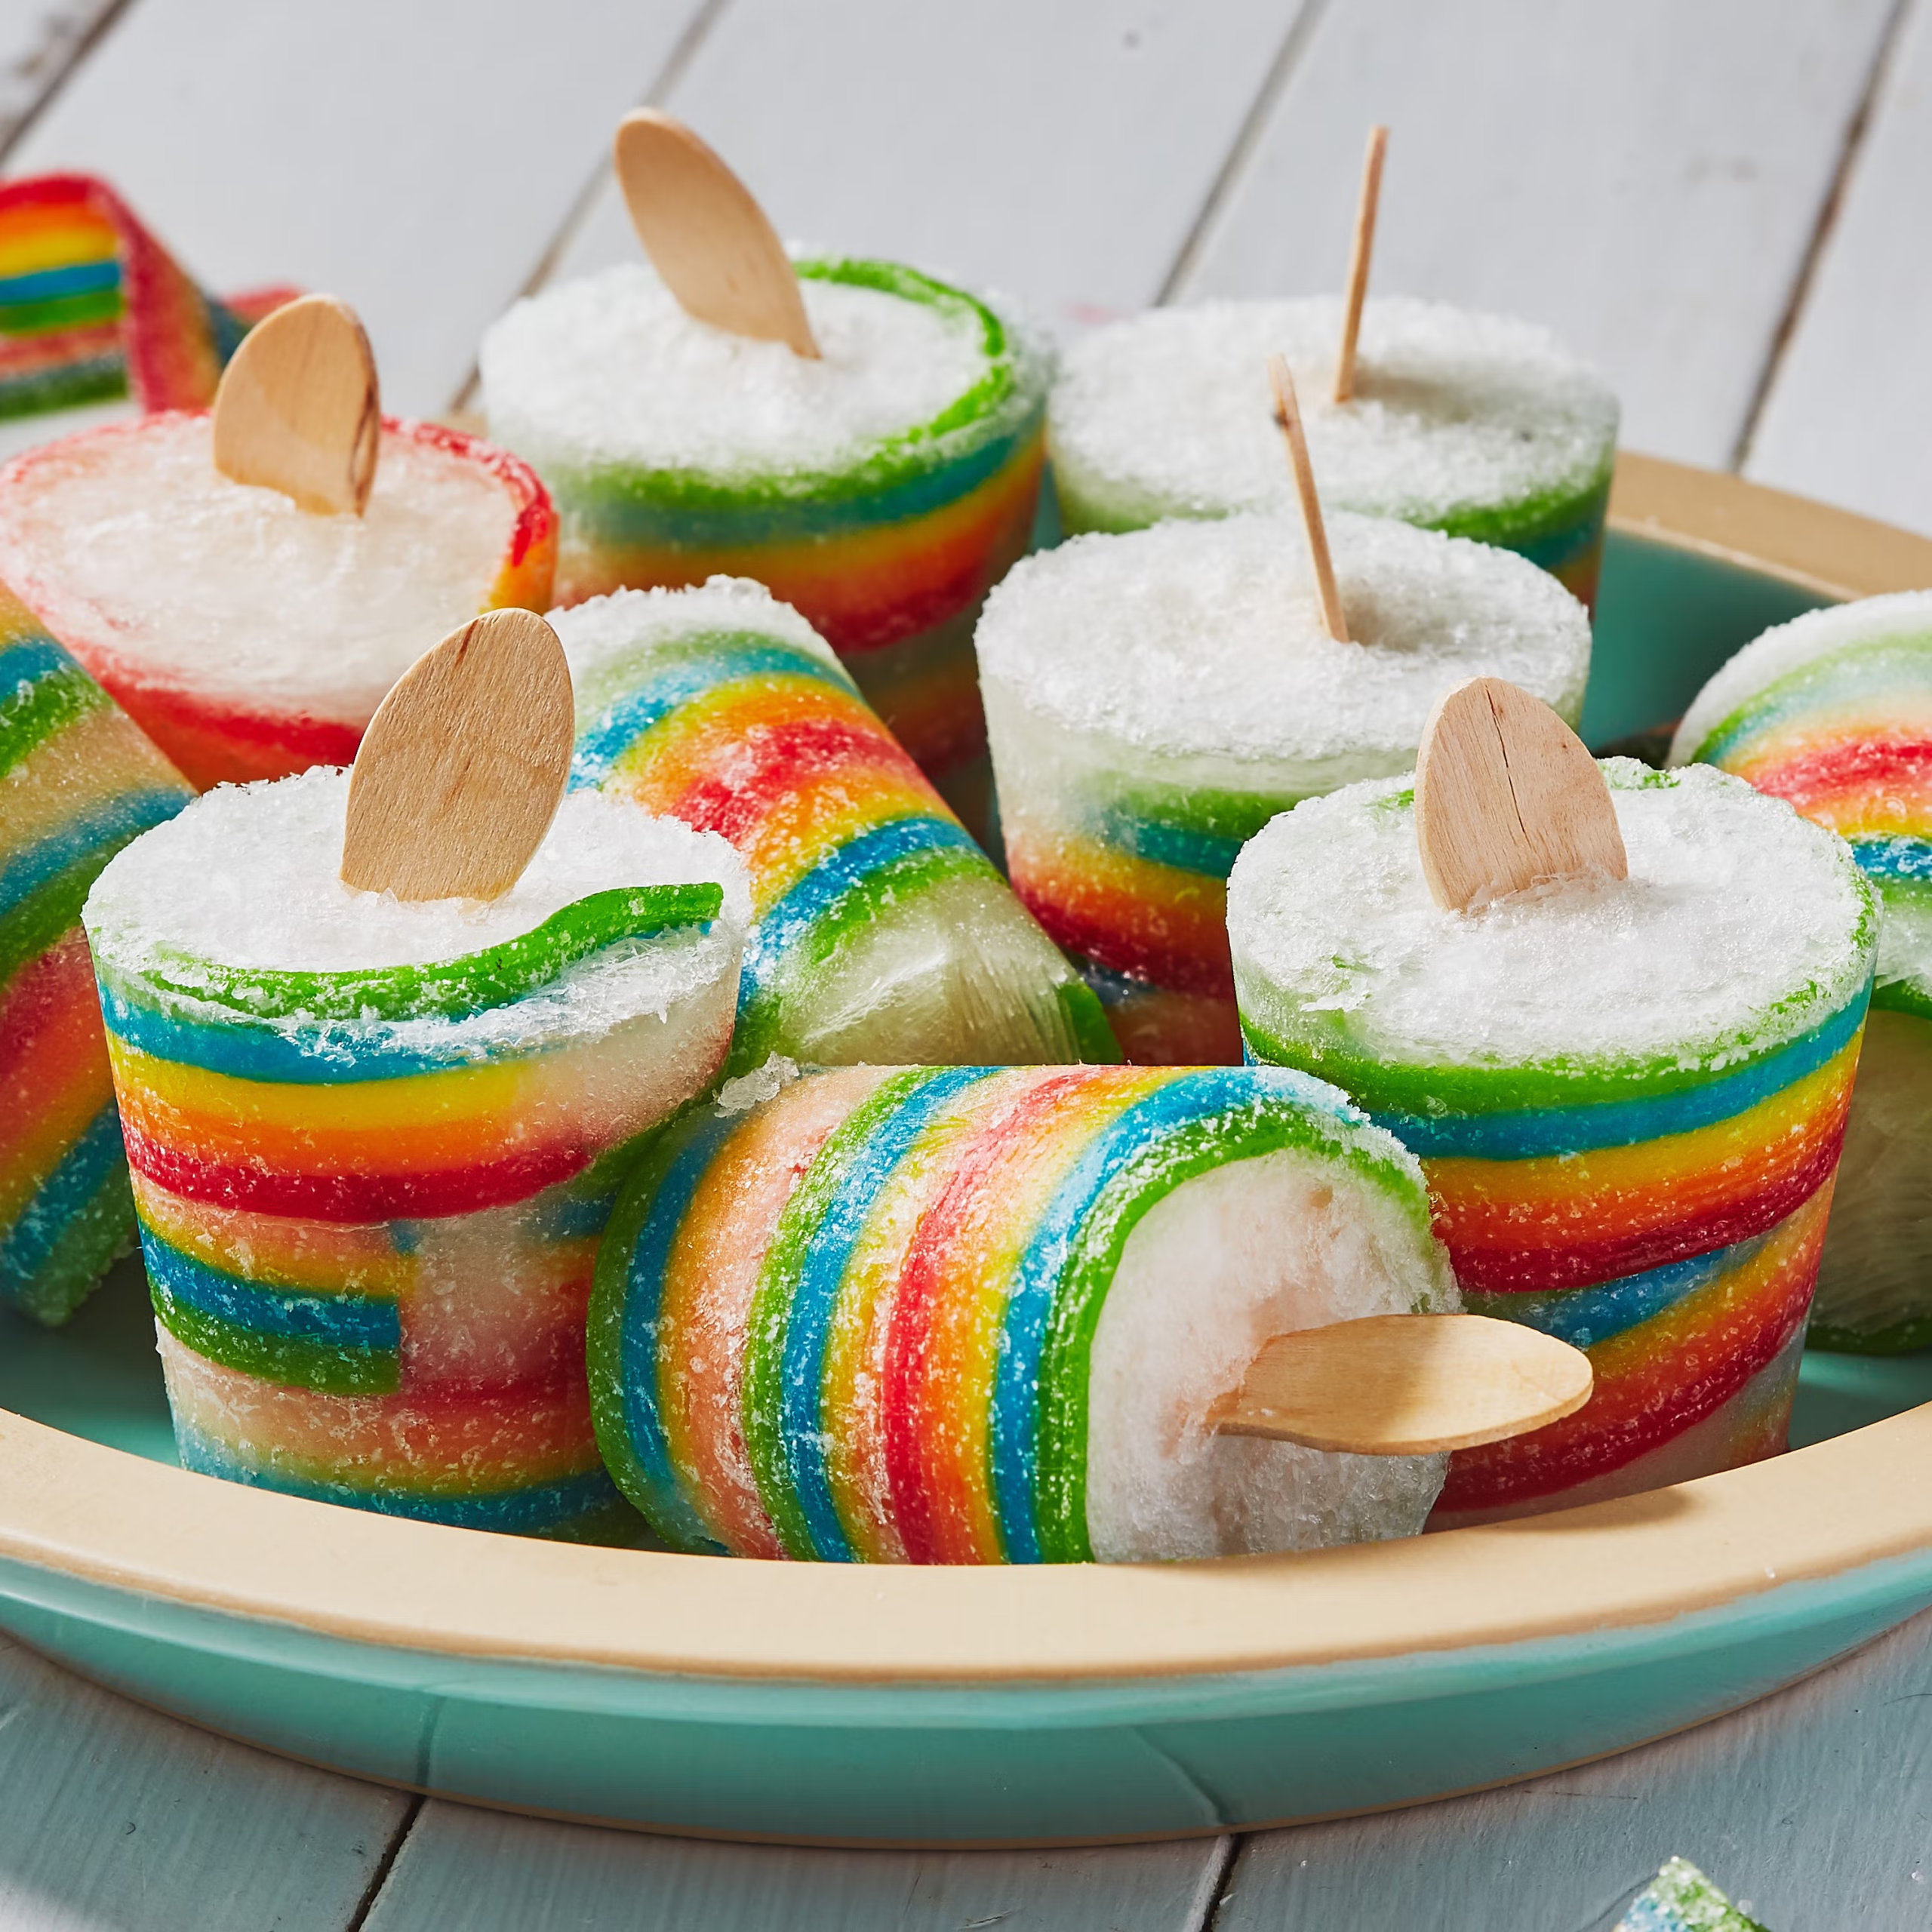
Tag: SnackTime

Salami Chips

Salami Chips

Salami Chips are crispy, savory, and surprisingly addictive. Baked until perfectly crunchy, they’re an easy snack or appetizer that delivers big flavor with minimal effort—perfect for charcuterie boards, party platters, or anytime a salty crunch is calling. Prep Time: 5 minsCook Time: 25minsYields:4 serving(s) Ingredients Step 1 

Oatmeal Raisin Breakfast Cookie Sandwiches

Oatmeal Raisin Breakfast Cookie Sandwiches

Oatmeal Raisin Breakfast Cookie Sandwiches are soft, chewy, and packed with wholesome flavor. Sweet raisins and warm spices are sandwiched with a creamy filling, making them a satisfying breakfast or snack that feels indulgent yet perfectly portable for busy mornings. Prep Time:15minutes minutesCook Time:12minutes minutesServings:24 Cookies Ingredients Instructions  

Crispy Potato Stacks

Crispy Potato Stacks

Crispy Potato Stacks are thin, buttery layers of potatoes baked until golden and irresistible. Tender in the center with perfectly crisp edges, they make an elegant yet easy side dish that pairs beautifully with any meal simple ingredients turned into something special!

Prep – 15 minutes mins
Cook – 35 minutes mins
Serves – 6

Ingredients  

  • ▢ ¼ cup extra virgin olive oil, plus more for brushing
  • ▢ 1 tablespoon chopped fresh thyme
  • ▢ 1 teaspoon chopped fresh rosemary
  • ▢ 3 garlic clove, grated or finely minced
  • ▢ 1 teaspoon Kosher salt
  • ▢ 1 teaspoon sweet paprika
  • ▢ 2 pounds medium-sized Russet or Idaho potatoes, scrubbed, but not peeled
  • ▢ ¾ cup finely grated Parmesan cheese, divided
  • ▢ 2 tablespoons fresh minced chives or parsley leaves

Instructions 

  • Get ready. Arrange a rack in the middle of the oven and preheat to 400°F. Lightly brush the wells of a 12-cup muffin tin with olive oil.
  • Mix seasonings. In a large bowl, stir together the oil, thyme, rosemary, garlic, salt, and paprika.
  • Slice and toss potatoes. Cut the potatoes using a mandoline (with the safety guard!) or a very sharp knife into ⅛-inch thin slices. Add the potatoes to the bowl and toss well to coat with oil. Though it’s a little messy, the best way to make sure each slice is coated is to do this with your hands. Add ½ cup of the Parmesan and toss potatoes again until the cheese sticks to the slices.
  • Layer potatoes. Divide the potato slices among the cups of the prepared muffin tin, stacking the layers all the way to the top. The potatoes will shrink down as they cook.
  • Bake until tender. Place the pan on the middle rack of the oven and bake for 30 minutes. To test for doneness, pierce with the tip of a sharp paring knife. It should slide in easily, with no resistance. If not, return the pan to the oven and bake until tender, 10-15 minutes more.
  • Top with cheese and broil. Remove the muffin tin from the oven and sprinkle with the remaining ¼ cup Parmesan. Turn the oven to broil. Place on the top rack of the oven and broil until cheese is golden-brown and the edges of the potatoes are crispy, 3-5 minutes. (Keep a close eye to prevent burning).
  • Cool and serve. Let cool for 5-10 minutes, then run a knife or small offset spatula around the edges and bottom of each stack to release them. Serve immediately, sprinkled with a little extra salt and herbs.

Notes

  • Buy the right potatoes: Using low-moisture, starchy potatoes like russets are key to achieving crisp edges. I don’t recommend replacing them with other varieties like red potatoes or Yukon Golds, which are higher in moisture and won’t crisp up. It’s also best to use medium-sized, not overly large potatoes, so the slices will fit nicely in the muffin tins.
  • Slice them thin: The key to the recipe is slicing the potatoes into very thin, uniform slices, which helps them cook through quickly. A very sharp, thin-bladed knife is good, but a mandoline is better at creating extra-thin, uniform potato slices and it makes the task easier and much quicker. Don’t worry, these tools are very safe as long as you use them with the hand guard. My favorite type usually sells for under $30. If you simply cannot be bothered to use the plastic guard, do as restaurant workers do and wear a cut-resistant glove on your potato-holding hand. 
  • Choose a mild olive oil: To avoid overpowering the flavor of the potatoes, I recommend a mild-flavored oil like our smooth Italian Nocellara.
  • Measure the salt: Salt is key to bringing out the flavor of the potatoes. Use too little and the potatoes will be bland, which is why I give an exact measurement in this recipe. For extra flavor, sprinkle the stacks with an extra pinch of salt after they come out of the oven.
  • Use your hands: Though it’s a little messy, the best way to make sure each slice of potato is coated evenly with the olive oil and herbs is to do this with your hands.
  • Make them Ahead: When you’re planning a complex holiday dinner, it’s nice to be able to make a few dishes in advance. These Crispy Potato Stacks are easy to prepare the day before. Instead of baking them for the full 30 minutes, bake for just 15, then cool and chill overnight. The next day, bring them to room temperature and finish the baking process.

Nutrition

Calories: 256.3kcalCarbohydrates: 29.9gProtein: 7.2gFat: 12.7gSaturated Fat: 3.2gPolyunsaturated Fat: 1.2gMonounsaturated Fat: 7.4gCholesterol: 10.9mgSodium: 614.7mgPotassium: 677.5mgFiber: 2.3gSugar: 1gVitamin A: 373.4IUVitamin C: 11.5mgCalcium: 139.7mgIron: 1.7mg

Waffled Grilled Cheese

Waffled Grilled Cheese

Enter this waffled prosciutto grilled cheese: It’s a hot sandwich that’s salty, sweet, spicy and melty in all the right ways. Prosciutto crackles and brings lots of salty umami, while the pepper jelly brings a little sweet sass. And the cheese? Ah, the cheese stretch 

Crispy Rice Omelet Pizza

Crispy Rice Omelet Pizza

Try making this crispy rice omelet instead of another fried rice with leftovers! It’s easy and crispy, and it takes less than 10 minutes to make. This recipe is topped with Chinese sausage and scallion oil, but you can get creative with your choice of 

Pumpkin Donut Holes

Pumpkin Donut Holes

Imagine pockets of spice-kissed autumn: golden orbs of tender dough, melting away to reveal pumpkin’s quiet warmth wrapped in cinnamon’s embrace. Each bite is a miniature harvest crisp sugar giving way to pillowy softness, where nutmeg and ginger dance like fallen leaves. Effortlessly cozy, yet impossibly bright, they turn ordinary moments into spice-kissed reverie. Pure, edible comfort in every tiny, sunlit globe.

Prep: 20 minutes minutes
Cook: 15 minutes minutes
Yield: 24 mini muffins

Ingredients

  • 1 ¾ cups all-purpose flour
  • ½ teaspoon ground cinnamon
  • ½ teaspoon ground nutmeg
  • ½ teaspoon ground allspice
  • ⅛ teaspoon ground cloves
  • 2 teaspoons baking powder
  • ½ teaspoon salt
  • ¾ cup pumpkin puree
  • ½ cup milk
  • ½ cup brown sugar
  • ⅓ cup canola oil
  • 1 large egg
  • 1 teaspoon vanilla extract
  • 4 tablespoons unsalted butter, melted

For the cinnamon sugar topping

  • 2 tablespoons ground cinnamon
  • ⅔ cup sugar

Instructions

  • Preheat oven to 350 degrees F. Lightly oil a mini muffin pan or coat with nonstick spray.
  • In a large bowl, combine flour, cinnamon, nutmeg, allspice, cloves, baking powder and salt.
  • In a large glass measuring cup or another bowl, whisk together pumpkin puree, milk, brown sugar, canola oil, egg and vanilla.
  • Pour mixture over dry ingredients and stir using a rubber spatula just until moist.
  • Scoop the batter evenly into the muffin tray.
  • Place into oven and bake for 10-12 minutes, or until a tester inserted in the center comes out clean.
  • When the muffins are done, cool for 2 minutes and dip each muffin into the melted butter and then into the cinnamon sugar topping.
  • Let cool on a wire rack.

For the cinnamon sugar topping

  • In a medium bowl, combine cinnamon and sugar.
Easy Cherry Turnovers

Easy Cherry Turnovers

A pockets of sunshine, folded into golden, buttery pastry that shatters at first bite. Inside, cherries burst like tiny jewels tart, bright, and glistening swirled into a jammy hug that tastes like summer’s last kiss. Effortless to make, yet impossibly elegant: these turnovers turn a 

Smal-batch Cookie Dough Ice Cream Bites

Smal-batch Cookie Dough Ice Cream Bites

Imagine childhood dreams frozen into velvet: pockets of creamy ice cream cradling stolen bites of buttery cookie dough, all wrapped in a crisp chocolate shell. Each tiny bite is a secret cool, chewy, and impossibly indulgent melting into sun-warmed happiness. Handcrafted for moments that deserve 

Berry Donuts

Berry Donuts

Berry Donuts are sweet, colorful, and full of fresh berry goodness. Each bite is tender and lightly fruity, making them a fun and delicious treat that feels special enough for brunch but easy enough for an everyday indulgence.

Prep Time: 15 minutes
Cook Time: 15 minutes
Yield: 8 donuts

Ingredients

  • 1/2 cup all-purpose flour
  • 1/2 cup whole wheat flour*
  • 1/2 tsp cinnamon
  • 1/4 tsp nutmeg
  • 1/2 tsp baking soda
  • 1/4 tsp baking powder
  • 1/4 tsp salt
  • 1/4 cup plain Greek yogurt, room temperature
  • 1/4 cup maple syrup*
  • 1 egg, room temperature
  • 1 ripe banana, mashed well
  • 1/2 tsp pure vanilla extract
  • 2 tbsp oil (vegetable, avocado or grapeseed)
  • 3/4 cup mixed berries, fresh*

Vanilla Glaze

  • 1/2 cup powdered sugar
  • 1–2 tbsp heavy cream
  • 1/2 tsp pure vanilla extract

Instructions

  1. Preheat the oven to 350 F and spray a donut pan with non-stick spray.
  2. In a medium-sized mixing bowl, whisk together both flours, cinnamon, nutmeg, baking soda, baking powder and salt.
  3. In another mixing bowl, whisk together the Greek yogurt, maple syrup, egg and mashed banana until smooth. Gently add the wet ingredients to the dry, stirring until just combined. Fold in the berries carefully.
  4. Scrape the batter into a piping bag or large Ziploc bag with the end cut off, and fill each cavity until 2/3 full. Bake for 10-12 minutes, or until the donuts spring back lightly when poked. Allow the donuts to cool for 5 minutes in the pan before removing them and cooling completely on a wire rack while you prepare the glaze.
  5. In a shallow bowl, whisk together the powdered sugar, heavy cream, and vanilla extract until smooth. Add more cream or powdered sugar to achieve your desired consistency. Dip the donuts, one by one into the shallow bowl and set back on the rack to allow the glaze to slightly harden.*

Notes

  1. You could use 1 cup all-purpose flour but I would not recommend using only whole wheat flour
  2. Maple syrup could be substituted with agave syrup or honey
  3. Frozen berries may be used – do not thaw beforehand. Use small frozen berries to ensure they’re cooked through
  4. To make the pink coloured drizzle, set aside a small amount of glaze before dipping and add a drop of red food colouring. Once the donuts have all been dipped in the glaze, use a fork to drizzle the pink icing on top.
  5. Donuts are best served immediately, but will keep in an airtight container for 2-3 days at room temperature. If the room is warm, the glaze will seep into the donuts.
Fruit Juice Pops

Fruit Juice Pops

If you’ve been buying overpriced popsicles at the store, I’ve got good news: making Fruit Juice Pops at home is ridiculously easy and way more fun. All you need is your favorite juice, a mold, and a little patience while they freeze. The result? Bright,