Tag: SweetTooth

Chocolate Peanut Clusters

Chocolate Peanut Clusters

Chocolate Peanut Clusters are the easiest edible gifts to make over Christmas! Slow cooker or stove top methods and only a handful of ingredients! Prep Time:5minutes minsCook Time:10minutes minsServings:60 clusters (or more) Ingredients Instructions  STOVE TOP: SLOW COOKER: Notes Refrigerate in an airtight container for up to 1 

Brioche French Toast

Brioche French Toast

Thick slices of buttery brioche soak up a lightly sweetened vanilla-cinnamon custard, then cook until golden with a soft, custardy center. An easy, indulgent French toast perfect for weekend brunch. Ingredients Optional Toppings Instructions Notes

Easy Chocolate Pudding

Easy Chocolate Pudding

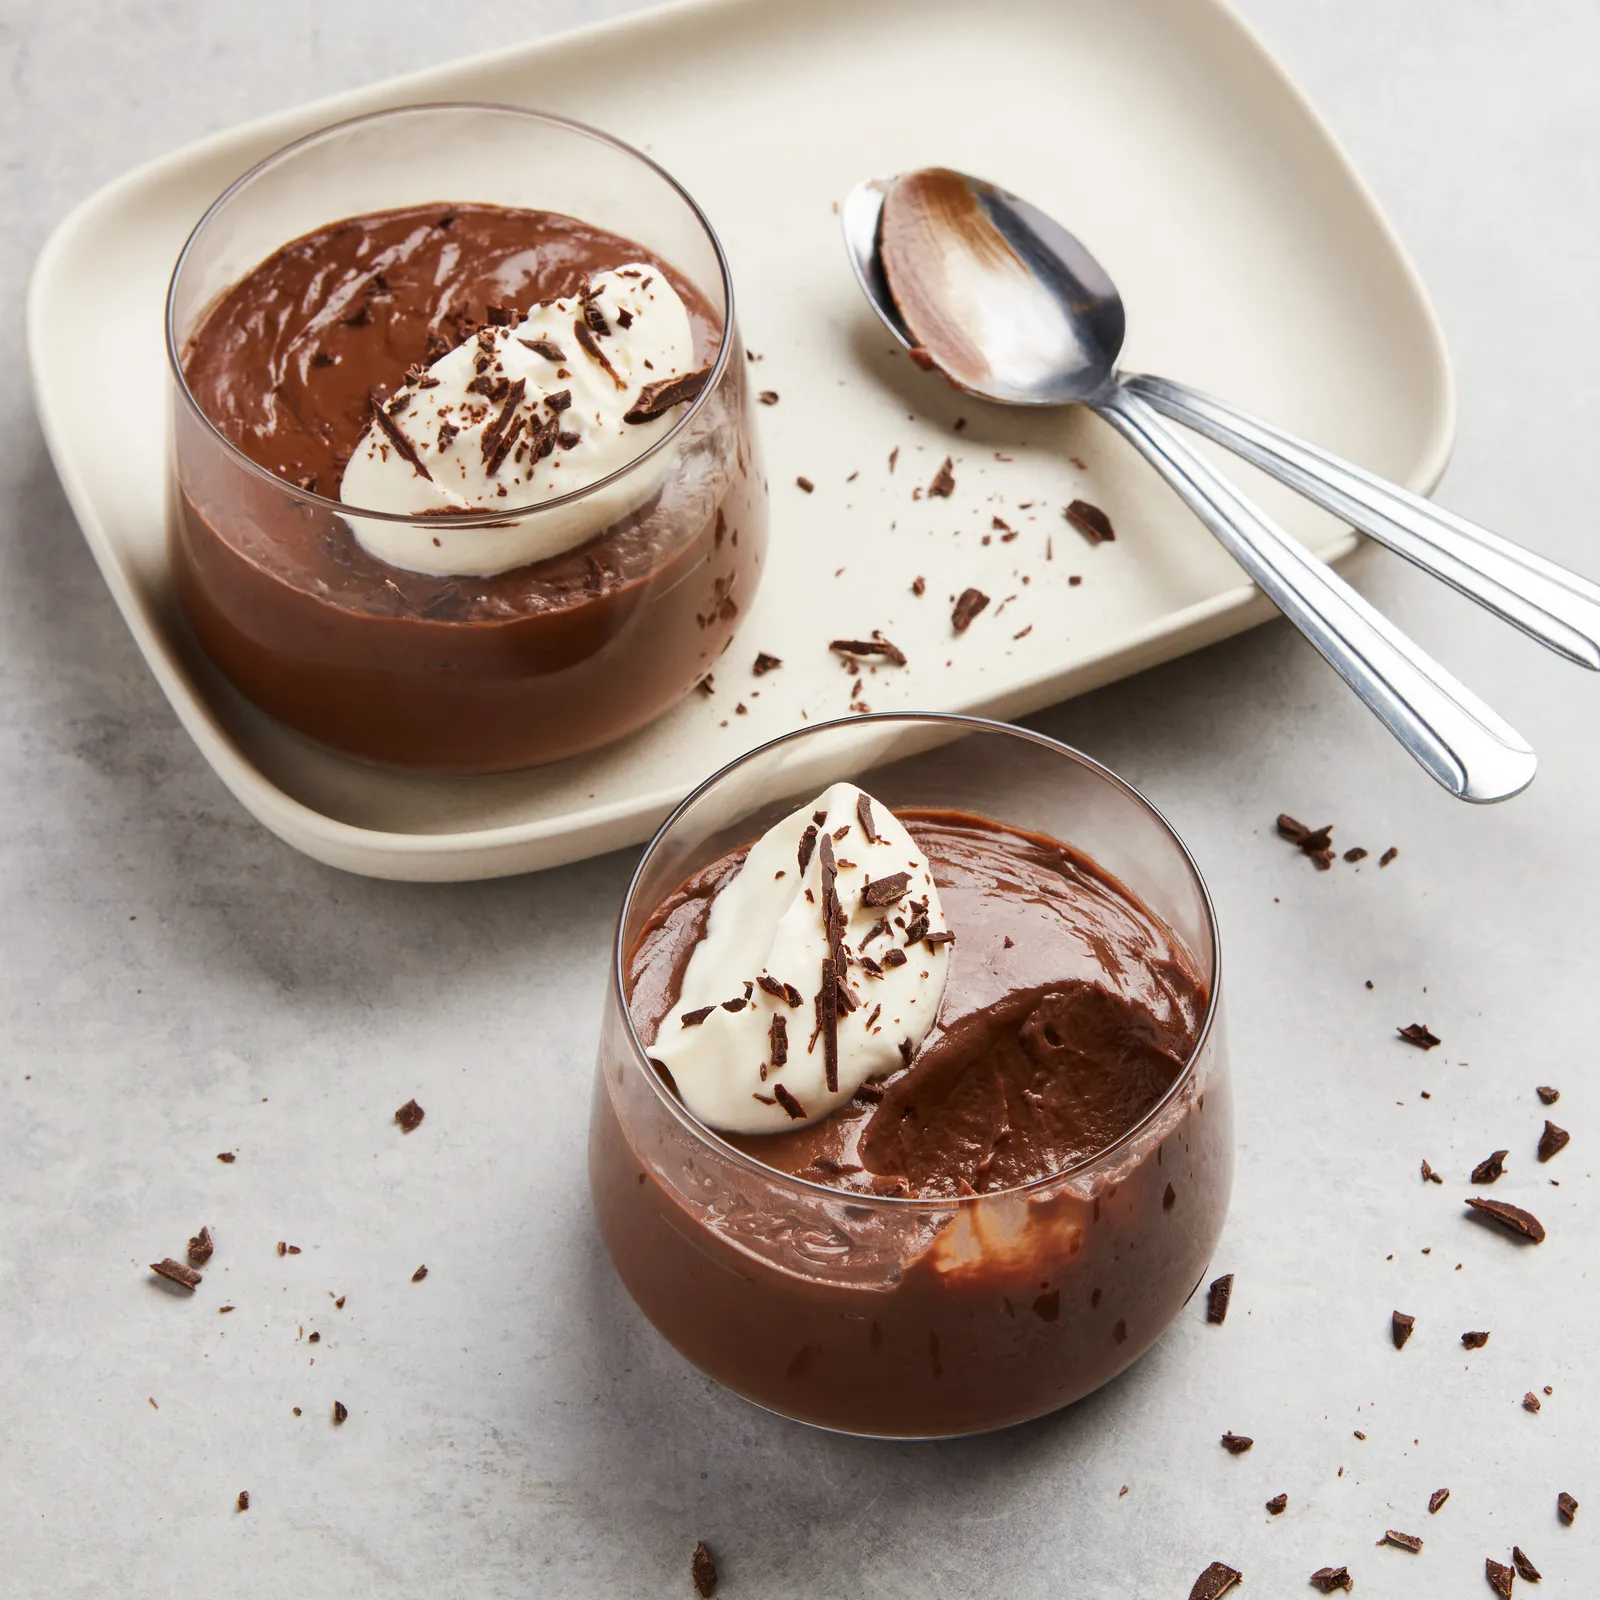
Homemade chocolate pudding never disappoints. It’s familiar without being boring and has a luscious texture and rich chocolate flavor that, let’s be honest, is leagues ahead of even the best store-bought versions. It’s also the rare chocolate dessert that doesn’t require turning on your oven. The main flavoring here is chopped bittersweet chocolate, so splurge on the best you can afford.

Recipe information

  • Total Time45 minutes (includes chilling)
  • Yield2 servings

Ingredients

½ cup sugar

2 Tbsp. cornstarch

Kosher salt

4 oz. fine-quality bittersweet chocolate, chopped, plus more for garnish

1⅓ cups whole milk

1 large egg yolk

1 Tbsp. unsalted butter

¼ tsp. vanilla extract

Sweetened whipped cream for serving (optional)

Preparation

Step 1

In a heavy medium saucepan whisk together ½ cup sugar, 2 Tbsp. cornstarch, and a pinch of kosher salt. Add chocolate to sugar mixture and set aside.

Step 2

Whisk 1⅓ cups whole milk and 1 large egg yolk in a small bowl to combine. Gradually add milk mixture to the dry ingredients. Place saucepan on the stovetop over medium heat and bring to a boil, whisking constantly. Cook pudding until thickened, making sure to scrape into the bottom corners of the saucepan, about 1 minute. Remove pan from heat and whisk in 1 Tbsp. unsalted butter and ¼ tsp. vanilla extract.

Step 3

Divide warm pudding between two 8-oz. ramekins. Chill chocolate puddings in freezer, surfaces covered with plastic wrap, until cooled, about 30 minutes. Top with dollops of sweetened whipped cream and chocolate shavings (if using).

NOTES:

Bar chocolate or wafers are preferred since chocolate chips are often made with stabilizers that prevent them from melting not good for pudding. Avoid milk chocolate, which would throw off the balance of flavors. If you prefer a dairy-free dessert, swap the whole milk for almond milk, oat milk, or whatever alternative you keep on hand, and use a plant-based butter.

Arguably the most sensitive moment of this simple recipe for two is when you put the portioned puddings into the freezer to chill. Cover each homemade pudding carefully, making sure the plastic wrap touches the surface of the pudding to prevent a thick skin from forming.

There are all sorts of ways to customize this easy chocolate pudding recipe: For a fancy affair, garnish the tops of the puddings with a spoonful of whipped cream and a dusting of chocolate shavings or unsweetened cocoa powder. Something more casual? Go with crushed Oreos or brownie crumbles or swirl in a dollop of peanut butter while the chocolate is still warm. No matter how you dress it up or down, creamy chocolate pudding is always in style.

Pudding can be made 3 days ahead; keep refrigerated.

Belgian Waffle

Belgian Waffle

Crispy on the outside, fluffy on the inside, Belgian Waffles are the ultimate breakfast treat that never goes out of style. Whether you pile them high with fruit, drizzle them with syrup, or keep them classic with just a dusting of sugar, they’re the kind 

Mini Biscoff Cheesecakes

Mini Biscoff Cheesecakes

These mini Biscoff cheesecakes are creamy, spiced, and indulgent, with a crisp biscuit base, smooth baked filling and a generous layer of Biscoff spread on top. Prep Time30 minutes minsCook Time20 minutes minsServings12 cheesecake Ingredients For the base For the filling For the topping Make 

Basque Cheesecake

Basque Cheesecake

Baked at high heat for a golden finish, it’s simple yet indulgent, with hints of vanilla and lemon zest for brightness. Perfectly chilled, it’s smooth, decadent, and effortlessly elegant.

Prep Time: 15 minutes mins
Cook Time: 35 minutes mins
Servings: 8 people

Ingredients 

  • ▢ 13.5 oz cream cheese softened
  • ▢ ½ cup caster sugar
  • ▢ ⅛ tsp salt
  • ▢ ½ tsp vanilla paste or extract
  • ▢ 3 large eggs
  • ▢ 2 tbsp cornstarch
  • ▢ 6.8 fl oz heavy/whipping cream
  • ▢ 1 tbsp lemon zest ≈ zest of 1 small lemon

Instructions

  • Preheat oven to 445°F (230°C). Line a 6-inch round cake pan with baking paper, ensuring it rises at least 2 inches (5cm) above the rim.
  • In a large mixing bowl, add softened cream cheese. Use a spatula to mix until smooth and lump-free.
  • Add sugar, salt, vanilla, and lemon zest. Whisk until fully combined and smooth.
  • Add the eggs one at a time, whisking until each is fully incorporated before adding the next.
  • Sift in the cornstarch and whisk just until combined.
  • Pour in the heavy cream and whisk until smooth.
  • Place the cheesecake in the oven and immediately reduce heat to 430°F (220°C). Bake for about 25 minutes, or until the top is golden brown but the center still jiggles slightly.
  • Let cheesecake cool in the pan on a wire rack until it reaches room temperature. Refrigerate uncovered for at least 4 hours to set.
  • Gently remove the cheesecake from the pan and peel back the baking paper

Notes

Sweet Tips

  • Lower the calories: A great tip I do all the time when making this is to use low fat cream cheese and a sugar-free alternative (to sugar) like natvia. It keeps its same great taste while making it just a bit more of a feel-good treat
  • Texture preference: For a gooey center, let the cheesecake sit at room temperature for 30 minutes before serving. If you prefer a firmer texture, chill it longer in the fridge.
  • Cutting tip: Use a hot knife (dip in hot water and wipe clean between slices) to avoid the creamy center sticking to the blade and ruining the shape.
  • Pan size: Recipe fits a 6-inch (15cm) round pan. For larger pans, reduce baking time slightly.
  • Baking paper: Line with parchment that rises at least 2 inches (5cm) above the rim, as the cheesecake puffs up.
  • Browning: The dark, caramelized top is intentional and adds flavor—don’t worry if it looks burnt.
  • Flavor twist: Try a splash of liqueur (Amaretto, Grand Marnier, Rum) or a pinch of cinnamon.
  • Serving ideas: Pair with berries, honey, or whipped cream.
  • Storage: Refrigerate up to 3 days. Let slices rest at room temp before serving for the best texture.
  • Freezing: Wrap well and freeze up to 1 month. Thaw in the fridge overnight.

Nutrition

Calories: 218kcal | Carbohydrates: 8g | Protein: 7g | Fat: 18g | Saturated Fat: 11g | Polyunsaturated Fat: 1g | Monounsaturated Fat: 5g | Trans Fat: 0.01g | Cholesterol: 116mg | Sodium: 239mg | Potassium: 167mg | Fiber: 0.1g | Sugar: 4g | Vitamin A: 726IU | Vitamin C: 1mg | Calcium: 98mg | Iron: 0.4mg

Nutrition information is automatically calculated, so should only be used as an approximation.

Strawberry Cheesecake Hand Pies

Strawberry Cheesecake Hand Pies

These Strawberry Cheesecake Hand Pies are like a slice of strawberry pie meets strawberry cheesecake, all wrapped in a cute little hand-held dessert. The filling is rich and creamy, with the perfect juicy berries, surrounded by the best golden, and crispy crust. These are sweet, 

Cookie Monster Ice Cream

Cookie Monster Ice Cream

This cookie monster ice cream is a delicious blue colored vanilla based ice cream that is full of Oreo cookies, chocolate chip cookies, and edible cookie dough!  Prep Time 45 minsTotal Time 6 hrs 45 mins Ingredients   For the Cookie Monster Ice Cream: Edible Cookie 

Frosted Sugar Cookie Bars

Frosted Sugar Cookie Bars

These rich, fudgy brownies are perfectly moist and dense, with a deep chocolate flavor that melts in your mouth. Topped with a silky ganache and a sprinkle of sea salt… because balance is everything!

Prep Time: 25 minutes
Cook Time: 25 minutes
Total Time: 1 hour, 30 minutes
Yield: 16 bars

Ingredients

  • 1/2 cup (8 Tbsp; 113g) unsalted butter, softened to room temperature
  • 3/4 cup (150g) granulated sugar
  • 1 large egg + 1 egg yolk
  • 2 teaspoons pure vanilla extract
  • 1 and 1/2 cups (188g) all-purpose flour (spooned & leveled)
  • 1/4 teaspoon salt
  • 1 teaspoon baking powder
  • 1/2 teaspoon baking soda
  • 1 and 1/2 teaspoons cornstarch
  • 1/2 cup (80g) rainbow sprinkles (not nonpareils)

Vanilla Frosting

  • 3/4 cup (12 Tbsp; 170g) unsalted butter, softened to room temperature
  • 2 and 1/4 cups (270g) confectioners’ sugar
  • 3 Tablespoons (45ml) heavy cream or half-and-half
  • 1 teaspoon pure vanilla extract
  • salt, to taste
  • optional: food coloring (I used 1 drop red for this pink frosting) and extra sprinkles for decorating on top

Instructions

  1. Make the bars: Preheat oven to 350°F (177°C). Line an 8-inch square pan or 9-inch square pan with aluminum foil, making sure to leave enough overhang on the sides. Set aside.
  2. In a large bowl using a handheld mixer or stand mixer fitted with a paddle attachment, cream the softened butter for about 1 minute on medium speed. Get it nice and smooth, then add the sugar on medium speed until fluffy and light in color. Beat in egg, egg yolk, and vanilla. Scrape down the sides as needed.
  3. In a medium bowl, whisk together the flour, salt, baking powder, baking soda, and cornstarch. With the mixer running on low speed, slowly add the dry ingredients to the wet ingredients in 3 different parts. The dough is quite thick. Once combined, gently fold in 1/2 cup sprinkles using a silicone spatula (or by mixing on low speed).
  4. Press the cookie dough evenly into the prepared baking pan. Bake for 25-26 minutes or until very lightly browned on top. You want the cookie bars to be extra soft, so careful not to overbake. Allow the bars to cool completely on a wire rack at room temperature before frosting. The center will slightly sink that’s normal.
  5. Make the frosting: If you don’t want a super thick layer of frosting as pictured, halve the frosting recipe. With a handheld or stand mixer fitted with a paddle attachment, beat the butter on medium speed until creamy, about 2 minutes. Add confectioners’ sugar, cream, and vanilla extract with the mixer running on low. Increase to high speed and beat for 3 full minutes. Add more confectioners’ sugar if frosting is too thin or more cream if frosting is too thick. Add a pinch of salt if frosting is too sweet. I usually add anywhere between 1/8 – 1/4 teaspoon of salt. Beat in food coloring, if using.
  6. Remove cooled bars from the baking pan using the aluminum foil overhang on the sides. Frost the bars with a thick layer of frosting and decorate with extra sprinkles if desired. Cut into squares. Use a very sharp knife and wipe off with a paper towel between each cut to make neat, even cuts. Store bars in an airtight container at room temperature for up to 2 days and in the refrigerator up to 5.

Notes

  1. Make Ahead & Freezing Instructions: You can make these bars and the frosting 1 day in advance– store the bars, covered, at room temperature overnight and store the frosting, covered, in the refrigerator. Frost before cutting and serving. You can also freeze the unfrosted bars for up to 3 months. Thaw overnight in the refrigerator, frost, cut, and serve.
  2. Special Tools (affiliate links): 8-inch Square Pan or 9-inch Square Pan | Electric Mixer (Handheld or Stand) | Glass Mixing Bowl | Whisk | Silicone Spatula | Cooling Rack
  3. Eggs: Room temperature egg and egg yolk preferred. To bring the egg to room temperature quickly, place in a warm glass of water for about 10 minutes as you get the other ingredients ready. Or just set out when you set out the butter to soften 1 hour ahead of time.
  4. Sprinkles: Use regular sprinkles (aka “jimmies”) in the cookie bar base. Nonpareils (the little balls) will bleed their color and turn the sugar cookie dough green/purple/brown. I order my sprinkles in bulk here.
  5. Cream: Cream or half-and-half is preferred for creamiest, fluffiest frosting. Keeping that in mind, milk would be an OK substitute if you do not have either on hand.
  6. Larger Batch: You can double this recipe and bake in a 9×13-inch pan; the bake time is about 35 minutes.
Cookie Ice Cream Sandwiches

Cookie Ice Cream Sandwiches

This recipe produces a soft chocolate chip cookie which is perfect for making cookie ice cream sandwiches. You do not have to chill this cookie dough! For best results, I recommend using mini chocolate chips and freezing the assembled sandwiches for at least 3 hours.