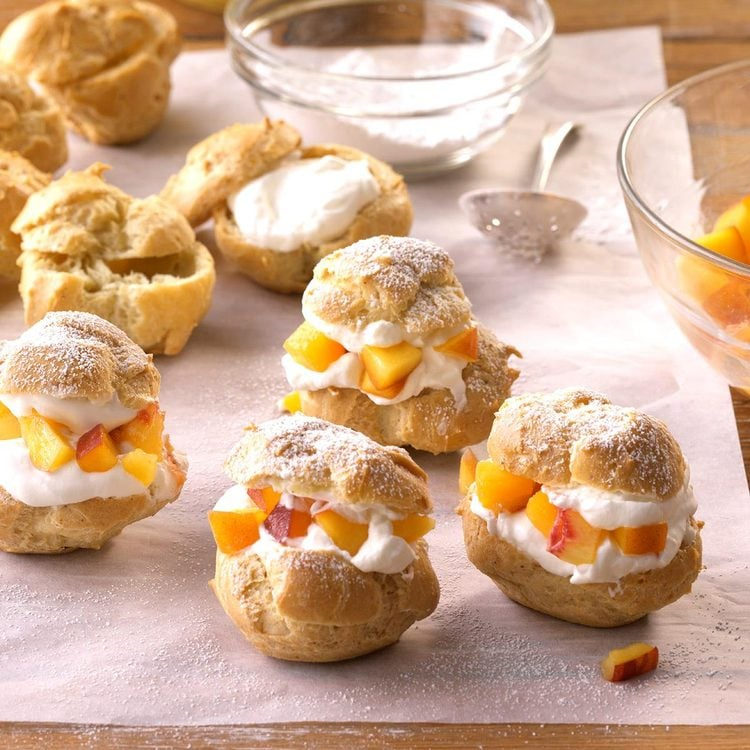
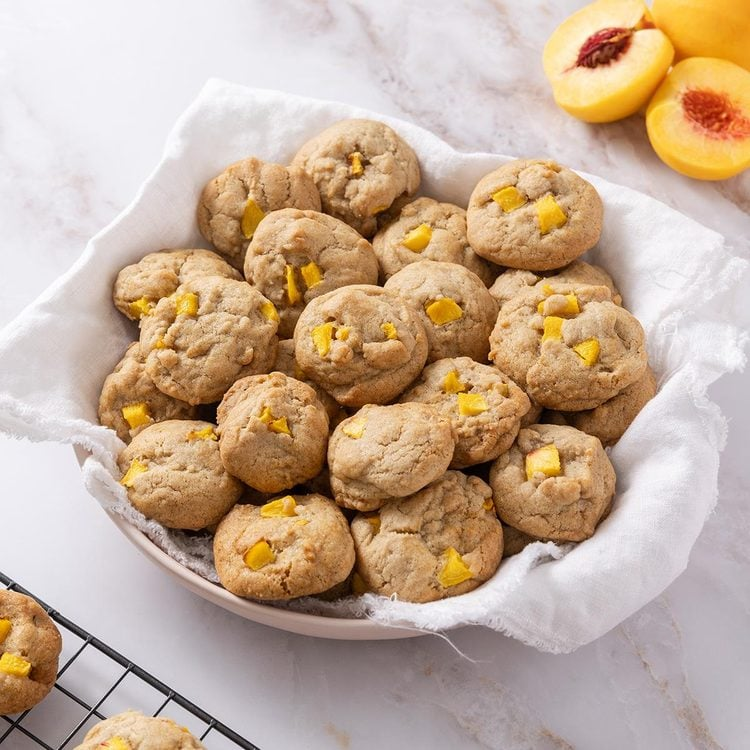
Recent Posts

Piña Colada

Piña Colada

With its storied combination of coconut, pineapple, and (two types of) rum, this frozen piña colada recipe turns out a tropical cocktail that’s creamy, just sweet enough, and utterly refreshing. The original version of this Caribbean drink is credited to bartender Ramon “Monchito” Marrero of 

Pocky S’Mores

Pocky S’Mores

Cookie, chocolate, and marshmallow: the delicious flavors of a s’more, rearranged. Store-bought marshmallows are fine, though this dessert is even better with the homemade version. Try mixing and matching marshmallow and Pocky flavors to find your favorite combination. For example, strawberry-flavored marshmallows with matcha-flavored Pocky 

Smoky Garlic Chicken Supreme

Smoky Garlic Chicken Supreme

This easy grilled chicken recipe is a fast track to weeknight dinner, with a built-in marinade that’s made entirely with inexpensive ingredients you may already have in your pantry. It also adjusts to your schedule and equipment setup.

Recipe information

  • Total Time30 minutes, plus marinating
  • Yield4 servings

Ingredients

2 large shallots, finely chopped

4 garlic cloves, finely grated

⅔ cup extra-virgin olive oil, plus more for grill

¼ cup sherry vinegar or red wine vinegar

3 Tbsp. fresh lemon juice

2 Tbsp. fresh lime juice

1 Tbsp. Diamond Crystal or 1¾ tsp. Morton kosher salt

1 tsp. sugar

½ tsp. freshly ground black pepper

4 skinless, boneless chicken breasts (about 1½ lb.)

Preparation

Step 1

Whisk 2 large shallots, finely chopped, 4 garlic cloves, finely grated, ⅔ cup extra-virgin olive oil, ¼ cup sherry vinegar or red wine vinegar, 3 Tbsp. fresh lemon juice, 2 Tbsp. fresh lime juice, 1 Tbsp. Diamond Crystal or 1¾ tsp. Morton kosher salt, 1 tsp. sugar, and ½ tsp. freshly ground black pepper in a medium bowl to combine. Set ⅓ cup marinade aside.

tep 2

Arrange 4 skinless, boneless chicken breasts (about 1½ lb.) in a single layer in a baking dish. Pour remaining marinade over chicken and turn to coat. Cover dish and chill, turning chicken halfway through, at least 30 minutes and up to 4 hours.

Step 3

Prepare a grill for medium-high heat; oil grate. Remove chicken from marinade, letting excess drip back into dish; discard marinade in dish. Grill chicken, turning halfway through, until cooked through and blackened grill marks appear, 10–14 minutes. Transfer to a cutting board and let rest 5–10 minutes before slicing.

Step 4

Serve chicken with reserved marinade spooned over.

Notes:

The marinated chicken can rest for 30 minutes or up to several hours before cooking, and is equally delicious if fired on a gas or charcoal grill or even cooked in a grill pan on the stovetop.

About that marinade: The punchy mix of shallots, garlic, sherry vinegar, and citrus takes skinless, boneless chicken breasts an infamously bland cut when treated poorly to a better plane, imbuing the meat with bright flavor and ensuring it’s juicy all the way through. A pinch of sugar encourages defined grill marks and crispy edges. Make sure to portion off a bit of the marinade before adding the chicken you’ll use it to sauce the meat once it’s off the grill.

Cook the chicken for 5–7 minutes per side (the internal temperature should reach 160°F) before removing from the heat, where the chicken temperature will continue to rise. Then, slice the charred and juicy chicken against the grain to pile on to salads or grain bowls, stuff into tacos and sandwiches, or eat alongside any of your favorite grilled side dishes.

Frozen Watermelon Margarita

Frozen Watermelon Margarita

Watermelon varies in sweetness, so taste as you go and adjust the amount of sugar accordingly. You can also swap the white sugar for agave syrup to complement the tequila’s flavor. As for that spirit, blanco tequila has a mild, grassy flavor ideal for this 

Crack Dip

Crack Dip

An amazing dip for parties with only four ingredients! A creamy base with bacon, cheddar and ranch seasoning mix. Prep:10minutes mins Ingredients Instructions Tips Store leftover crack dip in an airtight container in the fridge for up to 3-4 days. Before serving again give it a 

New York Cheesecake

New York Cheesecake

The easiest New York cheesecake you will ever make. You get that signature dense texture without the hassle of a water bath. Paired with a quick Biscoff crust, this foolproof dessert bakes beautifully every time. Just make sure to chill it completely before slicing!

Prep Time:5minutes mins
Cook Time:55minutes mins
Servings:8

Ingredients

For the Biscuit Crust

  • ▢2 cups biscoff cookies biscuits (measured after crushing, about 25 cookies)
  • ▢1/4 cup butter melted

For the Cheesecake Filling

  • ▢2 1/4 cups cream cheese softened
  • ▢1 1/4 g sour cream
  • ▢1 cup sugar
  • ▢3 eggs
  • ▢1 1/2 tsp vanilla extract
  • ▢2 tbsp plain all-purpose flour

Topping

  • ▢Biscoff smooth spread

Instructions 

For the Cheesecake Filling:

  • In a large mixing bowl, add the softened cream cheese, sour cream, sugar, and vanilla. Stir well until smooth and fully combined.
  • Add the eggs and mix well again.

After adding the eggs, use the lowest speed to have better control of the batter texture.

  • Add the flour and mix one last time until incorporated.

For the Biscuit Crust:

  • In a blender, add the Biscoff biscuits (cookies) and blend until they resemble sand.
  • Mix the blended biscuits with melted butter.
  • In an 8-inch round mold, add the biscuit mixture and press it down to create a flat, even layer. Bake in a preheated oven at 170°C (338°F) for about 10 minutes.

20 cm in diameter

For Baking and Assembly:

  • Remove the crust from the oven, pour the cheesecake mixture over it, and put it back in the oven to bake for 45 to 50 minutes at 170°C (338°F).
  • Remove from the oven, let it cool down a bit at room temperature, and then reserve it in the fridge for at least 2 hours before demolding and cutting.
  • Drizzle some Biscoff spread on each slice.

You can use any type of biscuit and any spread

Notes

Storage & Make Ahead

This cheesecake is the BEST make-ahead dessert because it literally needs plenty of time to set up properly. I actually prefer making it the day before I plan to serve it, which takes away all the stress of baking on the day of a dinner or party.

  • Fridge storage: Keep any leftovers in an airtight container or wrap the mold tightly in plastic wrap. It stays fresh in the fridge for up to 5 days.
  • Freezer storage: Cheesecakes freeze incredibly well. Wrap the whole cake or individual slices in a layer of plastic wrap, followed by a layer of aluminum foil. You can keep it in the freezer for up to 2 months. When you want a slice, just leave it to thaw overnight in the fridge.

When you wrap your cheesecake to store it in the fridge, lay a piece of paper towel flat across the top of the pan before covering it with plastic wrap. The paper towel catches any condensation, keeping the top of your cheesecake dry and stopping your biscuit crust from getting soggy over time.

Nutrition

Calories: 636kcal | Carbohydrates: 67g | Protein: 17g | Fat: 33g | Saturated Fat: 8g | Polyunsaturated Fat: 2g | Monounsaturated Fat: 4g | Trans Fat: 0.01g | Cholesterol: 69mg | Sodium: 566mg | Potassium: 217mg | Fiber: 0.1g | Sugar: 51g | Vitamin A: 393IU | Vitamin C: 0.01mg | Calcium: 248mg | Iron: 1mg

Nutrition information is automatically calculated, so should only be used as an approximation.

Cherry Matcha Cookies

Cherry Matcha Cookies

If your ideal afternoon consists of a creamy iced matcha latte with a little something sweet on the side, these cherry matcha cookies are sure to become your new baking obsession. Even the trendiest coffee shops just discovered this well-balanced and insanely delicious flavor combination, so bringing these cookies to the 

Rainbow Candy Pops

Rainbow Candy Pops

Frozen cocktails are always winners during the hot summer months, but frozen cocktail pops? A party game-changer. We use only 3 ingredients to create these boozy pops: lemon-lime soda, vodka, and everyone’s favorite kind of sour candy. Prep Time:10 minTotal Time:4 hrs 10 minsYields:4 Ingredients Directions Step 1 In a large glass measuring cup, 

Hamburger Buns

Hamburger Buns

THE BEST (and easiest) buns! So soft, pillowy and airy, perfect for any burger or sandwich. You’ll never want store-bought buns ever again!

Prep: 2hours hours 20minutes minutes
Cook: 20minutes minutes
Yield: 8 servings

Ingredients

  • ¾ cup warm water, 100-110 degrees F
  • 3 tablespoons sugar
  • 2 ¼ teaspoons active dry yeast
  • 3 tablespoons unsalted butter, at room temperature
  • 2 large eggs, at room temperature, divided
  • 3 ¼ cups all purpose flour, divided
  • 1 ¼ teaspoons kosher salt
  • 2 tablespoons milk
  • 1 tablespoon sesame seeds

Instructions

  • Combine water, sugar and yeast in a small bowl; let stand until foamy, about 5 minutes.
  • In the bowl of an electric mixer fitted with dough hook attachment, beat the water mixture, butter, 1 egg, 2 cups flour and salt on medium-low speed until a smooth batter forms, about 1-2 minutes.
  • Gradually add remaining 1 1/4 cups flour, 1/2 cup at a time, until a soft, smooth ball of dough is formed. The dough should feel elastic and slightly tacky to the touch. Increase speed to medium-high and beat for 3 minutes.
  • Lightly oil a large bowl or coat with nonstick spray; place dough in bowl, turning to coat. Cover with a clean dishtowel and let stand in a warm spot until dough has doubled in size, about 45 minutes to 1 hour.
  • Gently deflate dough by punching down.
  • Working on a lightly floured surface, divide into 8 equal pieces, weighing the pieces as needed; shape each piece into a smooth ball.
  • Line a baking sheet with parchment paper. Place rolls onto the prepared baking sheet; flatten each ball to 3 inches.
  • Cover with a clean dishtowel and let stand in a warm spot until dough has doubled in size, about 45 minutes to 1 hour.
  • Preheat oven to 375 degrees F.
  • In a small bowl, whisk together remaining egg and milk. Brush tops of dough with egg mixture; sprinkle with sesame seeds.
  • Place into oven and bake until golden brown, about 15-18 minutes.

Equipment

Electric Mixer

Baking Sheet

Baking Sheet

Caramel Chocolate Almond Clusters

Caramel Chocolate Almond Clusters

Salted Caramel Chocolate Almond Clusters are the perfect blend of sweet, salty, and crunchy. Rich chocolate coats roasted almonds and buttery caramel, creating bite-sized treats that deliver layers of texture and flavor in every indulgent bite. Perfect for gifting, sharing, or satisfying a sweet craving.