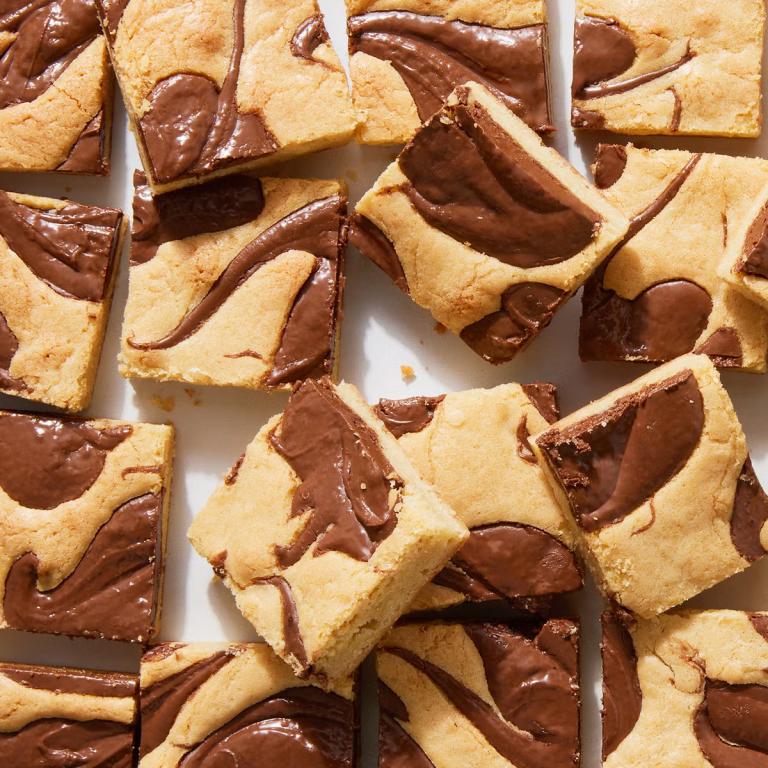
Tag: SweetTreats

Nutella Blondies

Nutella Blondies

Rich, chewy, and irresistibly chocolatey, these Nutella blondies combine the creamy hazelnut spread with a soft, golden-brown base for a decadent treat that’s perfect any time of day. Yields: 20 PicesPrep Time: 10 minsTotal Time: 50 mins Ingredients Directions Step 1 Preheat oven to 350°. Line 

Burnt Basque Cheesecake (La Viña Style)

Burnt Basque Cheesecake (La Viña Style)

This easy burnt Basque cheesecake recipe comes from the Devour Tours cookbook and is based on the original version served at La Viña in San Sebastián. Prep Time: 15 minutes minutesCook Time: 45 minutes minutesTotal Time: 1 hour hourServings: 8 slices Ingredients Instructions Nutrition Information 

Quesillo Canario: Canarian Style Flan

Quesillo Canario: Canarian Style Flan

Quesillo canario is a delicious Spanish flan recipe from the Canary Islands. It’s made with condensed milk and flavored with lemon zest, and is a perfectly creamy caramel dessert!

Prep Time: 10 minutes minutes
Cook Time: 50 minutes minutes
Chill Time: 4 hours hours
Total Time: 5 hours hours
Servings: 8 servings

Ingredients

For the Caramel

  • ▢ ½ cup granulated sugar
  • ▢ ¼ cup water

For the Custard

  • ▢ 6 large eggs
  • ▢ 2 cups whole milk
  • ▢ 2 cups condensed milk
  • ▢ 1 teaspoon vanilla extract
  • ▢ zest of 1 lemon
bowls of ingredients for quesillo canario.

Instructions

  • Preheat the oven to 350°F (175°C). Butter a flan pan or baking mold and set it aside.

Making the Caramel

  • Pour the granulated sugar and the water into a heavy-based saucepan and set it over medium heat. Stir until the sugar has dissolved, then stop stirring and bring the mixture to a boil. Let it cook until the sugar has turned a rich golden brown, being careful not to let it burn.
  • Immediately pour the hot caramel into the buttered flan pan and turn it so the base and sides of the pan are coated in caramel. Work quickly before it hardens!

Making the Quesillo

  • Beat the eggs well, and then whisk in the condensed milk and vanilla until the mixture is combined. Beat in the whole milk and lemon zest.
  • Pour the egg and milk mixture into the flan mold, and place in a large roasting pan. Create the bain marie by filling it with enough boiling water to go halfway up the side of the flan mold.
  • Bake the quesillo at 350°F (175°C) for about 35-50 minutes, or until it has an internal temperature of 175°F (79°C). The baking time will depend on the pan you are using, so after about 35 minutes, check it frequently.
  • Let the flan cool completely; preferably, chill it in the fridge overnight or for at least 4 hours.

Serving

  • When you’re ready to serve the quesillo, run a knife around the edge, then place a serving plate over the pan, flip it over, and carefully remove the pan. The flan should easily come out.
  • Serve with some caramel sauce and enjoy!

Notes

  • When making the caramel, don’t stir it after the sugar has dissolved, or the caramel will crystallize and you’ll have to redo it. Watch it carefully as it cooks to prevent it from burning.
  • Be sure to bake the flan in a hot water bath (called baño maría in Spanish or bain marie in French) to keep it from boiling and cracking in the oven.
  • Bake the flan until it’s just set; overcooking it will make it tough and rubbery. When it’s done, it should have an internal temperature of 175°F (79°C) in its deepest part.

Nutrition

Calories: 378.92kcal |
Carbohydrates: 57.22g |
Protein: 12.21g |
Fat: 11.79g |
Saturated Fat: 6.37g |
Polyunsaturated Fat: 0.95g |
Monounsaturated Fat: 3.49g |
Trans Fat: 0.01g |
Cholesterol: 156.09mg |
Sodium: 167.73mg |
Potassium: 421.85mg |
Sugar: 57.21g |
Vitamin A: 481.27IU |
Vitamin C: 1.99mg |
Calcium: 311.17mg |
Iron: 0.73mg

Polvorones: Spanish Christmas Cookies

Polvorones: Spanish Christmas Cookies

Polvorones are a traditional Christmas cookie from the south of Spain. Made from almonds, they crumble into a delicate powder in your mouth, perfect for soaking up eggnog! Prep Time: 30 minutes minutesCook Time: 30 minutes minutesServings: 16 cookies Ingredients Instructions Notes Nutrition Calories: 178.26kcal 

Quick & Easy Honey Pear Tart

Quick & Easy Honey Pear Tart

Sweet and salty, super easy honey pear tart with goat cheese, honey, and toasty almonds. Prep Time: 15 minutesCook Time: 40 minutesYield: serves 12 Ingredients Instructions Notes Estimated Nutrition Per Serving

Peppermint Mocha Cookies

Peppermint Mocha Cookies

These peppermint mocha cookies will be the star of your holiday cookie tray and cookie exchanges! The candy cane crunch and white chocolate put them over the top!

Prep Time: 3 hours, 30 minutes
Cook Time: 11 minutes
Total Time: 4 hours, 30 minutes (includes setting)
Yield: 20-22 cookies

Ingredients

  • 1/2 cup (8 Tbsp; 113g) unsalted butter, softened to room temperature
  • 1/2 cup (100g) granulated sugar
  • 1/2 cup (100g) packed light or dark brown sugar
  • 1 large egg, at room temperature
  • 1 teaspoon pure vanilla extract
  • 1 teaspoon peppermint extract
  • 1 cup (125g) all-purpose flour (spooned & leveled)
  • 1/2 cup + 2 Tablespoons (51g) unsweetened natural cocoa powder
  • 1 teaspoon baking soda
  • 2 teaspoons espresso powder or 1 Tablespoon instant coffee granules
  • 1/8 teaspoon salt
  • 1 cup (180g) mini or regular size semi-sweet chocolate chips
  • 8 ounces white chocolate, coarsely chopped
  • 3 large candy canes, crushed

Instructions

  1. In a large bowl using a handheld or stand mixer fitted with a paddle attachment, beat the butter, granulated sugar, and brown sugar together on medium high speed until fluffy and light in color, about 2-3 minutes. Add the egg, vanilla extract, and peppermint extract, and then beat on high speed until combined. Scrape down the sides and bottom of the bowl as needed.
  2. In a separate bowl, whisk the flour, cocoa powder, baking soda, espresso powder, and salt together until combined. With the mixer running on low speed, slowly pour into the wet ingredients. Beat on low until combined and then beat in the chocolate chips. The cookie dough will be thick and very sticky. Cover dough tightly and chill in the refrigerator for at least 3 hours and up to 3 days. Chilling is mandatory for this sticky cookie dough.
  3. Remove cookie dough from the refrigerator and allow to sit at room temperature for 10 minutes. If the cookie dough chilled longer than 3 hours, let it sit at room temperature for about 20 minutes. This makes the chilled cookie dough easier to scoop and roll.
  4. Preheat oven to 350°F (177°C). Line large baking sheets with parchment paper or silicone baking mats. (Always recommended for cookies.) Set aside.
  5. Scoop and roll dough, 1.5 Tablespoons of dough each, into balls. A medium cookie scoop is helpful for this step. To ensure a thicker cookie, make the balls taller than they are wide (almost like a cylinder or column). Arrange 2-3 inches apart on the baking sheets. The cookie dough is certainly sticky, so wipe your hands clean after every few balls of dough you shape.
  6. Bake the cookies for 11-12 minutes or until the edges appear set and the centers still look soft. Tip: If they aren’t really spreading by minute 9, remove them from the oven and lightly bang the baking sheet on the counter 2-3x. This helps initiate that spread. Return to the oven to continue baking.
  7. Cool cookies for 5 minutes on the baking sheet, and then transfer to a cooling rack to cool completely. The cookies will slightly deflate as they cool. 
  8. Melt the chopped white chocolate in a double boiler or use the microwave. For the microwave, place the white chocolate in a medium heat-proof bowl. Melt in 15 second increments, stirring after each increment until completely melted and smooth. Dip each completely cooled cookie halfway into the white chocolate and place onto a parchment or silicone baking mat-lined baking sheet. Sprinkle crushed candy canes on top of the chocolate. Repeat with the rest of the cooled cookies. Place the baking sheet into the refrigerator to help the chocolate set, about 1 hour.

Notes

  1. Make Ahead & Freezing Instructions: Cookies stay fresh covered at room temperature or in the refrigerator for up to 1 week. Baked cookies (without white chocolate and candy cane) freeze well for up to three months. Decorate after they thaw. Cookie dough balls freeze well for up to three months. Bake from frozen, no need to thaw just add an extra minute or two to the bake time. Read my tips and tricks on how to freeze cookie dough.
  2. Special Tools (affiliate links): Electric Mixer (Handheld or Stand) | Glass Mixing Bowl | Whisk | Baking Sheets | Silicone Baking Mats or Parchment Paper | Medium Cookie Scoop | Cooling Rack | Double Boiler (optional for melting chocolate) 
  3. Chill Cookie Dough: Make sure you chill the cookie dough for at least 3 hours. Chilling helps the flavors develop, prevent spreading, and makes the otherwise sticky cookie dough easy to handle.
  4. Larger Batch: The recipe is easy to double in 1 mixing bowl without overwhelming your mixer. Simply double all of the ingredients. Dough chill time remains the same.

Estimated Nutrition Per Cookie

  • Calories: ~190–210 kcal
  • Total Fat: ~10g
  • Saturated Fat: ~6g
  • Cholesterol: ~20mg
  • Sodium: ~90mg
  • Carbohydrates: ~26g
  • Sugars: ~19g
  • Fiber: ~2g
  • Protein: ~2g
Loaded Caramel Dipped Pretzels

Loaded Caramel Dipped Pretzels

Salty pretzels covered in caramel and topped with your favorite candies. These loaded caramel dipped pretzels are kid-friendly, perfect for gift-giving and bake sales, and satisfy your salty/sweet tooth! Prep Time: 20 minutesCook Time: 10 minutesTotal Time: 1 hourYield: 18 pretzels Ingredients Instructions Notes

Pumpkin Spice Truffles

Pumpkin Spice Truffles

Like most candy recipes, there isn’t room for ingredient substitution. I always recommend following the recipe as written. I find these truffles get even better and the pumpkin flavor becomes more prominent after a day or two in the refrigerator. Dip in white chocolate or 

Homemade Strawberry Shortcake

Homemade Strawberry Shortcake

Fresh summer strawberries shine in this simple homemade strawberry shortcake recipe. The biscuits don’t rise super tall, but you’ll enjoy their crisp crumbly texture paired with the soft whipped cream and juicy strawberries.

  • Prep Time: 30 minutes
  • Cook Time: 15 minutes
  • Total Time: 1 hour
  • Yield: serves 10-12

Ingredients

Strawberries + Whipped Cream

  • 6–7 cups quartered strawberries
  • 1/4 cup + 2 Tablespoons (75g) granulated sugar, divided
  • 1 teaspoon pure vanilla extract
  • 1 cup (240ml) heavy cream

Biscuits

  • 2 and 3/4 cups (345g) all-purpose flour, plus extra for hands and work surface*
  • 1/4 cup (50g) granulated sugar
  • 4 teaspoons aluminum free baking powder
  • 1/2 teaspoon baking soda
  • 1 teaspoon salt (I recommend fine sea salt)
  • 3/4 cup (12 Tbsp; 170g) unsalted butter, cold and cubed
  • 1 cup (240ml) cold buttermilk*
  • 2 Tablespoons (30ml) heavy cream or buttermilk
  • coarse sugar, for sprinkling

Instructions

  1. Start with the strawberries: Stir the strawberries and 1/4 cup (50g) granulated sugar together in a large bowl. Cover and set in the refrigerator until ready to use. This time allows the strawberries to release their delicious juices.
  2. Make the biscuits: Preheat oven to 400°F (204°C). Mix the flour, granulated sugar, baking powder, baking soda, and salt together in a large bowl or in a large food processor. Whisk or pulse until combined. Add the cubed butter and cut into the dry ingredients with a pastry cutter or by pulsing several times in the processor. Pulse until coarse crumbs form. If you used a food processor, pour the mixture into a large bowl.
  3. Pour buttermilk on top. Fold everything together with a large spoon or silicone spatula until it begins to come together. Do not overwork the dough. The dough will be shaggy and crumbly with some wet spots. Pour the dough and any dough crumbles onto a floured work surface and gently bring together with generously floured hands. Have extra flour nearby and use it often to flour your hands and work surface in this step. Using floured hands or a floured rolling pin, flatten into a 3/4 inch thick rectangle as best you can. Fold one side into the center, then the other side. Turn the dough horizontally. Gently flatten into a 3/4 inch thick rectangle again. Repeat the folding again. Turn the dough horizontally one more time. Gently flatten into a 3/4 inch thick rectangle. Repeat the folding one last time. Flatten into the final 3/4 inch thick rectangle.
  4. Cut into 2.75 or 3-inch circles with a biscuit cutter. (Tip: Do not twist the biscuit cutter when pressing down into the dough.) Re-roll/flatten any scraps and cut more circles until you have around 10-12 biscuits.
  5. Arrange in a 10-inch cast iron skillet (see note) or close together on a parchment paper or silicone baking mat lined baking sheet. Make sure the biscuits are touching.
  6. Brush the tops with 2 Tablespoons heavy cream or buttermilk and sprinkle with coarse sugar. Bake for 18-22 minutes or until biscuits are golden brown on top. Remove from the oven, then cool in the pan for at least 10 minutes before assembling.
  7. Make the whipped cream: Using a hand mixer or a stand mixer fitted with a whisk attachment, beat the heavy cream, 2 Tablespoons granulated sugar, and vanilla on medium-high speed until soft-medium peaks form, about 3 minutes.
  8. Slice the biscuits in half and layer with strawberries and whipped cream. Serve immediately.

Notes

  1. Make Ahead Instructions: Each part of this recipe can be prepared ahead of time. Make the biscuits up to 3 days in advance and store covered tightly at room temperature—or freeze for up to 3 months. Thaw completely before using. Prepare the strawberries in step 1 up to 1 day in advance. Prepare the whipped cream up to 1 day in advance. Store both in the refrigerator.
  2. Special Tools (affiliate links): Glass Mixing Bowls | Pastry Cutter or Food Processor | Wooden Spoon or Silicone Spatula | Rolling Pin | 3-Inch Biscuit Cutter or 2.75-Inch Biscuit Cutter | 10-inch Cast Iron Skillet | Baking Sheet | Silicone Baking Mat or Parchment Paper | Pastry Brush | Electric Mixer (Handheld or Stand)
  3. Flour: Starting with cold flour is helpful when making biscuits. If you can remember, place the flour in the freezer 30 minutes before beginning.
  4. Baking Powder: To avoid a chemical aftertaste, make sure your baking powder is labeled aluminum free. I usually use Clabber Girl brand and though the ingredients state aluminum, I’ve never noticed an aluminum aftertaste.
  5. Buttermilk: You can substitute whole milk for buttermilk if desired. Acidic buttermilk isn’t needed in order for the biscuits to rise since we’re using baking powder. However if you’d like the tangy flavor, which I highly recommend, you can make your own buttermilk substitute. Add 2 teaspoons of fresh lemon juice or white vinegar to a liquid measuring cup. Add enough cold milk to make 1 cup. (You need 1 cup in the recipe, plus 2 Tbsp for brushing– you can use regular milk to brush on top.) Whisk together, then let sit for 5 minutes before using in the recipe. Whole milk is best for the DIY sour milk substitute, though lower fat or nondairy milks work in a pinch. (In my testing, the biscuits don’t taste as rich or rise quite as tall using lower fat or nondairy milks.)
  6. If you’re using a cast iron skillet: If your cast iron skillet isn’t well seasoned, I recommend greasing it with a little vegetable oil or melted butter. Brush a thin layer of either on the bottom and around the sides. No need to heat the cast iron skillet before using, though you certainly can by placing it in the preheated oven for 15 minutes before arranging the shaped biscuits in it.
  7. Older Version of This Recipe: We tested and retested this recipe based on reader feedback. Old version of this recipe called for 3 cups (375g) all-purpose flour and 2 Tablespoons baking powder (no baking soda). The written recipe above yields better results with more flavorful and taller biscuits.
Gingerbread Swirl Fudge

Gingerbread Swirl Fudge

You only need a few simple ingredients and 1 pan to make this super creamy and easy gingerbread swirl fudge! Prep Time: 20 minutesCook Time: 5 minutesTotal Time: 6 hours, 15 minutesYield: 64 1-inch squares Ingredients Instructions Notes