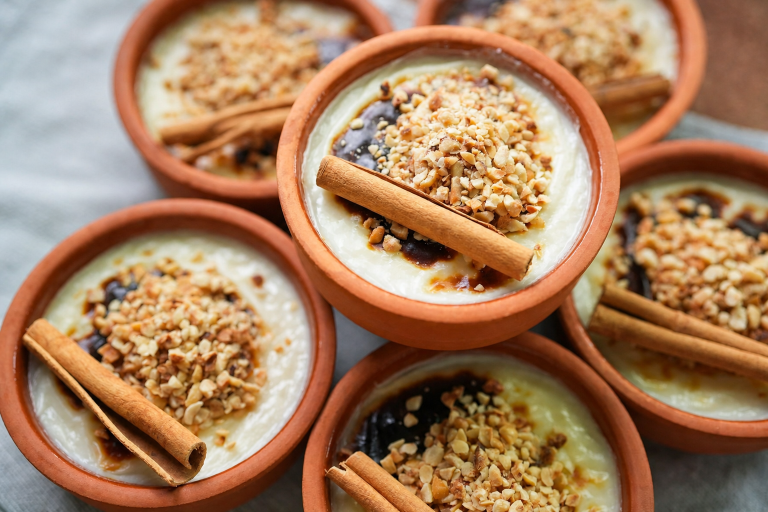
Deviled Potatoes are a fun, bite-sized twist on a classic favorite. Creamy, flavorful filling is nestled inside tender potato halves, creating a savory appetizer or side that’s perfect for parties, gatherings, or anytime a delicious, easy-to-eat snack is needed. Prep Time:20minutes minsCook Time:1hour hrServings:10 potatoes Ingredients Instructions Cook …
An easy, rustic, one pan dish with eggs poached in a rich, savory, garlicky tomato sauce. Best served with all the crusty bread for dunking! Prep: 15minutes minutesCook: 20minutes minutesYield: 4 servings Ingredients Instructions Equipment Cast Iron Skillet
Classic Cheesecake is rich, creamy, and perfectly smooth a timeless dessert that never goes out of style. With a buttery crust and a velvety filling, it’s ideal for celebrations, special occasions, or anytime a simple yet indulgent treat is needed.
1 and 1/2 cups (180g) graham cracker crumbs (about 12 full-sheet graham crackers)
1/4 cup (50g) granulated sugar
5 Tablespoons (71g) unsalted butter, melted
Cheesecake
32 ounces (904g) full-fat brick cream cheese, softened to room temperature
1 cup (200g) granulated sugar
1 cup (240g) full-fat sour cream, at room temperature
1 teaspoon pure vanilla extract
2 teaspoons fresh lemon juice (optional, but recommended)
3 large eggs, at room temperature
Instructions
Adjust the oven rack to the lower-middle position and preheat oven to 350°F (177°C).
Make the crust: If you’re starting out with full graham crackers, use a food processor or blender to grind them into fine crumbs. Pour into a medium bowl and stir in the sugar until combined, and then stir in the melted butter. Mixture will be sandy. Try to smash/break up any large chunks. Pour into an ungreased 9-inch or 10-inch springform pan. With medium pressure using your hand, pat the crumbs down into the bottom and partly up the sides to make a compact crust. Do not pack down with heavy force because that makes the crust too hard. Simply pat down until the mixture is no longer crumby/crumbly (you can use the flat bottom of a small measuring cup to help smooth it out if needed). Bake for 10 minutes. Remove from the oven and set aside while you prepare the filling.
Make the filling: In a large bowl using a handheld or stand mixer fitted with a paddle attachment, beat the cream cheese and granulated sugar together on medium-high speed until the mixture is smooth and creamy, about 2 minutes. Add the sour cream, vanilla extract, and lemon juice and beat until fully combined. With the mixer on medium speed, add the eggs one at a time, beating after each addition until just combined. Stop the mixer as soon as the final egg is fully incorporated into the batter; over-mixing can cause the cheesecake to deflate. You will have nearly 6 cups of batter.
Prepare the simple water bath (see Note): (If needed for extra visuals, see How to Make a Cheesecake Water Bath; the visual guide and video will assist you in this step.) Boil a kettle/pot of water. You need 1 inch of water in your roasting pan for the water bath, so make sure you boil enough. I use an entire kettle of hot water. As the water is heating up, wrap 1 or 2 sheets of heavy-duty aluminum foil around the springform pan—be careful if it’s still warm from baking the crust! Place the wrapped springform pan inside of a large roasting pan. Pour the cheesecake batter on top of the crust. Use a spatula to smooth it into an even layer. Carefully pour the hot water inside of the pan and place in the oven. (Or you can place the roasting pan in the oven first, then pour the hot water in—whichever is easier for you.)
Bake the cheesecake for 55–70 minutes or until the center is almost set. If you notice the cheesecake browning on top, tent it with aluminum foil halfway through baking. When it’s done, the center of the cheesecake should still slightly wobble if you gently tap or shake the pan. Turn the oven off and open the oven door slightly. With the door ajar, let the cheesecake sit in the oven in the water bath as it cools down for 1 hour. After 1 hour, remove from the oven and water bath, discard the foil, and place the springform pan on a cooling rack to cool completely at room temperature. When it has cooled, cover and refrigerate the cheesecake for at least 4 hours or up to 2 days.
Run a knife around the edges of the springform pan to help loosen the cheesecake, then remove the outer rim. Using a sharp knife, cut into slices for serving. For neat slices, wipe the knife clean and dip it into warm water between each slice.
Serve cheesecake with desired toppings (see Note). Cover and store leftover cheesecake in the refrigerator for up to 4 days.
Notes
Make-Ahead Instructions: This cheesecake can be made the day before. It has to chill for quite some time before serving. See step 5. Another way to make this cheesecake ahead of time is to freeze it. Cheesecake can be frozen for up to 3 months. See instructions in blog post above.
Oreo Cookie Crust: Feel free to replace the graham cracker crust with this Oreo cookie crust. Spray bottom of springform pan with nonstick spray, as Oreo cookie crusts tend to stick. Pre-bake the crust, just as you do with the graham cracker crust in step 2 above.
Toppings: One of my favorite toppings for this cheesecake is raspberry sauce. Or you could top the baked and cooled cheesecake with salted caramel, lemon curd, strawberry topping, chocolate ganache, red wine chocolate ganache, fresh fruit, or whipped cream. The topping from my pecan pie cheesecake is also an option!
Alternate Water Bath Method: This method works as well, and you don’t have to bake the cheesecake IN water. Boil a kettle or pot of water. You need 1 inch of hot water in your roasting pan for the water bath, so make sure you boil enough. Place the cheesecake on the center oven rack of the preheated oven. Place a large metal baking or roasting pan (do not use glass—I usually use a 9×13-inch baking pan or an extra-large cast iron skillet) on the bottom rack. Pour boiling water into the empty pan, about 1 inch deep. Immediately close the oven door to trap the steam inside. This unique water bath adds steam to the oven without having the cheesecake sit inside the water itself. No need to wrap the springform pan in foil. See How to Make a Cheesecake Water Bath for more information.
Room-Temperature Ingredients: Bring all cold ingredients to room temperature before beginning. Room-temperature ingredients combine quickly and evenly, so you won’t risk over-mixing. Also, beating cold ingredients together will result in a chunky cheesecake batter, hardly the way you want to begin!
Non-US Readers: Don’t have graham crackers where you live? Use 200g ground digestive biscuit crumbs (about 2 cups; 13–14 biscuits), 1/3 cup (67g) granulated sugar, and 6 Tablespoons (85g) melted butter. Pre-bake the crust for a bit longer, about 12–14 minutes. And from what I understand, spreadable cream cheese sold in a tub in countries outside of the US is a little different from the spreadable cream cheese in the US. It’s thicker, sturdier, and more solid and should be OK for this recipe. I have no experience with it, but this is what I’ve heard from other non-US readers.
Hot Cross Muffins are a sweet, spiced treat inspired by the classic Easter favorite. Soft and tender with a hint of cinnamon and warm spices, they’re perfect for breakfast, brunch, or an afternoon snack, offering all the comforting flavors of the season in a convenient, …
Slow-Cooker Baked Apples are warm, tender, and filled with comforting flavors. Gently cooked with spices and a touch of sweetness, they’re an effortless dessert or cozy treat that fills the kitchen with inviting aromas perfect for chilly mornings or a simple, heartwarming finish to any …
When combined with the rich flavor of cocoa, avocado makes for a decadent, melt-in-your-mouth dessert. Avocado chocolate mousse is a dairy-free, gluten-free and vegan recipe that is indulgent and packed with nutrients, making it a healthier alternative to traditional chocolate mousse that still satisfies your sweet tooth.
Prep:5 min Yield:4 servings
Ingredients
1/4 cup refrigerated sweetened coconut milk
1/4 cup maple syrup
1/4 teaspoon vanilla extract
2 medium ripe avocados, peeled and pitted
1/4 cup baking cocoa
Directions
Place all ingredients in a blender; cover and process until smooth. Transfer to 4 dessert dishes. Refrigerate until serving, at least 2 hours.
These Nutella scrolls are made with homemade dough and filled with Nutella instead of the classic cinnamon, giving them a slightly more indulgent twist. Trust me, it’s like HEAVEN. Easy to cook and great to enjoy with the kids! Prep Time:25minutes minsCook Time:25minutes minsServings:12 rolls Ingredients Dough Filling …
Classic Waffles are golden, crisp on the outside, and light and fluffy on the inside. Perfect for breakfast or brunch, they’re versatile enough to enjoy with syrup, fruit, or a sprinkle of powdered sugar simple, comforting, and timeless. Prep Time:10 minsCook Time:15 minsServings:5 Ingredients Directions …
Russian tea cakes (a.k.a. snowball cookies) are incredibly easy to make with pantry staples. The melt-in-your-mouth dessert is a simple way to satisfy your sweet tooth during the holiday season.
Prep Time:20 mins Cook Time:15 mins Servings:36
Ingredients
1 cup unsalted butter, softened
1 teaspoon vanilla extract
2 cups all-purpose flour
6 tablespoons powdered sugar
1 cup finely chopped walnuts
⅓ cup powdered sugar, or more as needed
Directions
Step 1
Gather all ingredients.
Step 2
Preheat the oven to 350 degrees F (175 degrees C)
Step 3
Cream butter and vanilla together in a medium bowl with an electric mixer until smooth, 2 to 3 minutes.
Step 4
Whisk flour and 6 tablespoons powdered sugar together in separate bowl. Add to the butter mixture and stir until just blended. Add walnuts and mix until incorporated; mixture may be crumbly.
Step 5
Take small scoops of dough and roll between your hands into 1-inch balls. Place balls 2 inches apart on ungreased cookie sheets.
Step 6
Bake in the preheated oven until edges are just turning golden, about 12 minutes.
Step 7
Remove from the oven and transfer to a wire rack to cool for 15 minutes.
Step 8
Place remaining 1/3 cup powdered sugar in a small bowl. Roll cooled cookies in the powdered sugar once or twice.
These chocolate thumbprint turtle cookies are a rich chocolate cookie rolled in chopped pecans, filled with caramel, and drizzled with melted chocolate. They’ve got the perfect flavors of a turtle candy all in a delicious bite sized cookie, perfect for the holidays. Prep Time 18 minsCook Time 12 minsServings …