Tag: foodie

Broccoli Cheddar Soup

Broccoli Cheddar Soup

THE BEST broccoli cheese soup there ever was! So creamy, so cheesy. Perfect for those busy weeknights + picky eaters! Prep: 15minutes minutesCook: 45minutes minutesYield: 6 servings  Ingredients Instructions

Deviled Potatoes

Deviled Potatoes

Deviled Potatoes are a fun, bite-sized twist on a classic favorite. Creamy, flavorful filling is nestled inside tender potato halves, creating a savory appetizer or side that’s perfect for parties, gatherings, or anytime a delicious, easy-to-eat snack is needed. Prep Time:20minutes minsCook Time:1hour hrServings:10 potatoes Ingredients Instructions  Cook 

Classic Cheesecake

Classic Cheesecake

Classic Cheesecake is rich, creamy, and perfectly smooth a timeless dessert that never goes out of style. With a buttery crust and a velvety filling, it’s ideal for celebrations, special occasions, or anytime a simple yet indulgent treat is needed.

Prep Time: 45 minutes
Cook Time: 1 hour
Total Time: 7 hours, 45 minutes (includes chilling)

Ingredients

Graham Cracker Crust

  • 1 and 1/2 cups (180g) graham cracker crumbs (about 12 full-sheet graham crackers)
  • 1/4 cup (50g) granulated sugar
  • 5 Tablespoons (71g) unsalted butter, melted

Cheesecake

  • 32 ounces (904g) full-fat brick cream cheese, softened to room temperature
  • 1 cup (200g) granulated sugar
  • 1 cup (240g) full-fat sour cream, at room temperature
  • 1 teaspoon pure vanilla extract
  • 2 teaspoons fresh lemon juice (optional, but recommended)
  • 3 large eggs, at room temperature

Instructions

  1. Adjust the oven rack to the lower-middle position and preheat oven to 350°F (177°C).
  2. Make the crust: If you’re starting out with full graham crackers, use a food processor or blender to grind them into fine crumbs. Pour into a medium bowl and stir in the sugar until combined, and then stir in the melted butter. Mixture will be sandy. Try to smash/break up any large chunks. Pour into an ungreased 9-inch or 10-inch springform pan. With medium pressure using your hand, pat the crumbs down into the bottom and partly up the sides to make a compact crust. Do not pack down with heavy force because that makes the crust too hard. Simply pat down until the mixture is no longer crumby/crumbly (you can use the flat bottom of a small measuring cup to help smooth it out if needed). Bake for 10 minutes. Remove from the oven and set aside while you prepare the filling.
  3. Make the filling: In a large bowl using a handheld or stand mixer fitted with a paddle attachment, beat the cream cheese and granulated sugar together on medium-high speed until the mixture is smooth and creamy, about 2 minutes. Add the sour cream, vanilla extract, and lemon juice and beat until fully combined. With the mixer on medium speed, add the eggs one at a time, beating after each addition until just combined. Stop the mixer as soon as the final egg is fully incorporated into the batter; over-mixing can cause the cheesecake to deflate. You will have nearly 6 cups of batter.
  4. Prepare the simple water bath (see Note): (If needed for extra visuals, see How to Make a Cheesecake Water Bath; the visual guide and video will assist you in this step.) Boil a kettle/pot of water. You need 1 inch of water in your roasting pan for the water bath, so make sure you boil enough. I use an entire kettle of hot water. As the water is heating up, wrap 1 or 2 sheets of heavy-duty aluminum foil around the springform pan—be careful if it’s still warm from baking the crust! Place the wrapped springform pan inside of a large roasting pan. Pour the cheesecake batter on top of the crust. Use a spatula to smooth it into an even layer. Carefully pour the hot water inside of the pan and place in the oven. (Or you can place the roasting pan in the oven first, then pour the hot water in—whichever is easier for you.)
  5. Bake the cheesecake for 55–70 minutes or until the center is almost set. If you notice the cheesecake browning on top, tent it with aluminum foil halfway through baking. When it’s done, the center of the cheesecake should still slightly wobble if you gently tap or shake the pan. Turn the oven off and open the oven door slightly. With the door ajar, let the cheesecake sit in the oven in the water bath as it cools down for 1 hour. After 1 hour, remove from the oven and water bath, discard the foil, and place the springform pan on a cooling rack to cool completely at room temperature. When it has cooled, cover and refrigerate the cheesecake for at least 4 hours or up to 2 days.
  6. Run a knife around the edges of the springform pan to help loosen the cheesecake, then remove the outer rim. Using a sharp knife, cut into slices for serving. For neat slices, wipe the knife clean and dip it into warm water between each slice.
  7. Serve cheesecake with desired toppings (see Note). Cover and store leftover cheesecake in the refrigerator for up to 4 days.

Notes

  1. Make-Ahead Instructions: This cheesecake can be made the day before. It has to chill for quite some time before serving. See step 5. Another way to make this cheesecake ahead of time is to freeze it. Cheesecake can be frozen for up to 3 months. See instructions in blog post above.
  2. Special Tools (affiliate links): Food Processor | Glass Mixing Bowl | 9-inch Springform Pan or 10-inch Springform Pan | Electric Mixer (Handheld or Stand) | Roasting Pan | Silicone Spatula
  3. Oreo Cookie Crust: Feel free to replace the graham cracker crust with this Oreo cookie crust. Spray bottom of springform pan with nonstick spray, as Oreo cookie crusts tend to stick. Pre-bake the crust, just as you do with the graham cracker crust in step 2 above.
  4. Toppings: One of my favorite toppings for this cheesecake is raspberry sauce. Or you could top the baked and cooled cheesecake with salted caramel, lemon curd, strawberry topping, chocolate ganache, red wine chocolate ganache, fresh fruit, or whipped cream. The topping from my pecan pie cheesecake is also an option! 
  5. Alternate Water Bath Method: This method works as well, and you don’t have to bake the cheesecake IN water. Boil a kettle or pot of water. You need 1 inch of hot water in your roasting pan for the water bath, so make sure you boil enough. Place the cheesecake on the center oven rack of the preheated oven. Place a large metal baking or roasting pan (do not use glass—I usually use a 9×13-inch baking pan or an extra-large cast iron skillet) on the bottom rack. Pour boiling water into the empty pan, about 1 inch deep. Immediately close the oven door to trap the steam inside. This unique water bath adds steam to the oven without having the cheesecake sit inside the water itself. No need to wrap the springform pan in foil. See How to Make a Cheesecake Water Bath for more information.
  6. Room-Temperature Ingredients: Bring all cold ingredients to room temperature before beginning. Room-temperature ingredients combine quickly and evenly, so you won’t risk over-mixing. Also, beating cold ingredients together will result in a chunky cheesecake batter, hardly the way you want to begin!
  7. Non-US Readers: Don’t have graham crackers where you live? Use 200g ground digestive biscuit crumbs (about 2 cups; 13–14 biscuits), 1/3 cup (67g) granulated sugar, and 6 Tablespoons (85g) melted butter. Pre-bake the crust for a bit longer, about 12–14 minutes. And from what I understand, spreadable cream cheese sold in a tub in countries outside of the US is a little different from the spreadable cream cheese in the US. It’s thicker, sturdier, and more solid and should be OK for this recipe. I have no experience with it, but this is what I’ve heard from other non-US readers.
Ruth Reichl’s Matzo Brei

Ruth Reichl’s Matzo Brei

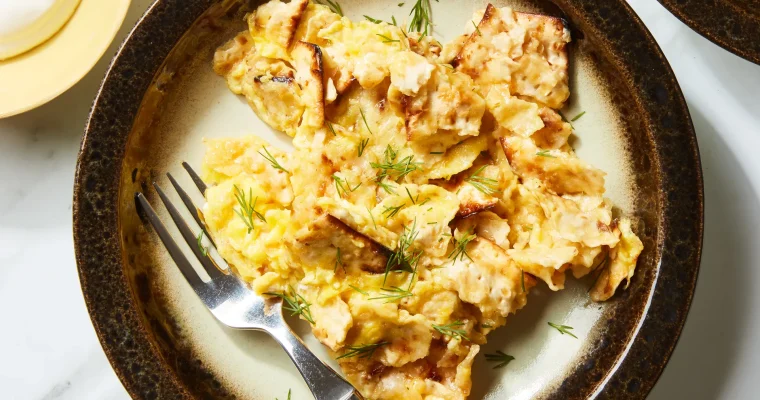
As with many traditional dishes, the answer to “how to make matzo brei” varies from recipe to recipe. But, no matter whom you ask, the staple Passover breakfast always starts with two core ingredients: matzo and beaten eggs. From there, debate ensues. How many matzo 

Braised Chicken With Olives and Citrus

Braised Chicken With Olives and Citrus

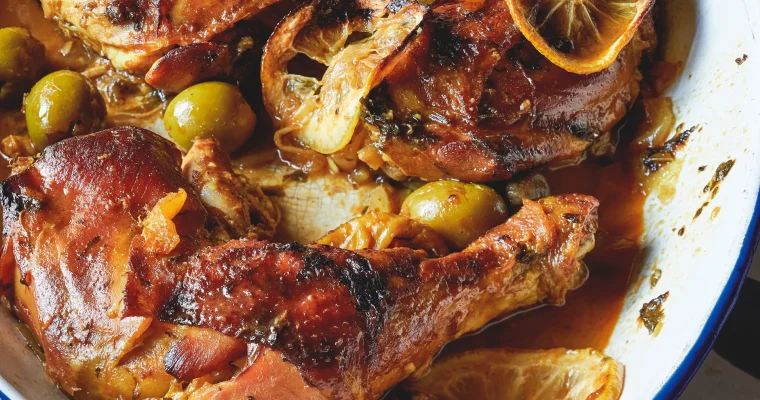
Chicken with olives is often a simple midweek dish, made with tomato paste and the most basic pitted olives, but this version, while still simple to make, is a delicious step up. In place of tomatoes, citrus provides the brightness fresh and preserved lemons, dried 

Nutella Rolls

Nutella Rolls

These Nutella scrolls are made with homemade dough and filled with Nutella instead of the classic cinnamon, giving them a slightly more indulgent twist. Trust me, it’s like HEAVEN. Easy to cook and great to enjoy with the kids!

Prep Time:25minutes mins
Cook Time:25minutes mins
Servings:12 rolls

Ingredients

Dough

  • ▢1 cup milk warmed to 110°F (44°C)
  • ▢2 1/4 tsp active dry yeast
  • ▢2 large eggs room temperature
  • ▢4 1/2 cups all-purpose flour
  • ▢1 tsp salt
  • ▢1/4 cup granulated sugar
  • ▢10 tbsp unsalted butter room temperature and cubed

Filling

  • ▢1 1/4 cups Nutella

Topping

  • ▢1/2 cup melted nutella extra, optional

Instructions 

  • Heat the milk until it reaches 110°F. Stir in the yeast and 1/2 tbsp sugar, then let it sit for 10 minutes until foamy.
  • In a large mixing bowl, sift the flour, then add salt and sugar. Add the cubed butter and work it in until it resembles small pea-sized pieces.
  • Lightly beat the eggs, then add them along with the yeast mixture into a stand mixer. Mix with a dough hook on low speed until the dough forms, then increase to medium and knead for 5 minutes.
  • Place the dough in a greased bowl, cover, and let it rise in a warm oven (turned OFF) for about 1 hour, or until doubled.
  • Turn the dough onto a lightly floured surface and roll it into a rectangle about 1/4 inch thick.
  • Warm the Nutella for about 15 seconds, then spread it evenly over the dough.
  • Roll the dough from the short side into a log, then cut into 12 rolls using a serrated knife or dental floss.
  • Place the rolls in a greased 9×13-inch pan, cover, and let rise again for 30 minutes to 1 hour.
  • Bake at 375°F for 23–27 minutes until lightly golden brown.
  • Spread or drizzle melted Nutella over the warm rolls.

Notes

This recipe is pretty forgiving, but a few small details can change how the rolls turn out.

Making the dough from scratch gives you more control over the texture. It might feel like an extra step, but it’s what keeps the rolls soft without turning dense or dry.

The milk temperature is one of the most important parts at the beginning. You’re aiming for around 110°F (43–44°C). If it’s too hot, it can kill the yeast, and if it’s too cool, the dough will take much longer to rise.

The flour also makes a difference here. If you can, weigh it (562 g) instead of using cups. It helps keep the dough consistent and prevents it from turning too dry.

Butter should be soft at room temperature, not melted. When you mix it into the flour, it creates a better texture in the dough and helps keep the rolls tender after baking.

The Nutella is what makes these different, so how you handle it matters. Slightly warming it helps it spread evenly, but if it’s too runny, it can start leaking out as you roll the dough.

The rise time is one of the most important parts. If the dough hasn’t fully doubled, the rolls won’t have the same texture after baking.

A few extra things to keep in mind:

  • The dough should feel soft before rising. If it feels too firm, the rolls will bake up heavier
  • If the dough sticks a little, that’s normal. Adding too much flour is what usually makes them dry
  • The filling will shift slightly as you roll, that’s okay as long as it’s mostly even
  • The rolls will continue to set slightly after coming out of the oven
  • They reheat well and soften again with a few seconds in the microwave

Once you’ve made them once, it’s easier to understand how the dough should feel and how the rolls should look before baking. After that, it becomes much more straightforward.

If you want them extra soft, let the rolls sit for about 5–10 minutes after baking before adding the Nutella on top. They’ll finish setting inside, and the heat will melt the Nutella just enough to spread smoothly without making the tops too messy.

Nutrition

Calories: 585kcal | Carbohydrates: 72g | Protein: 10g | Fat: 28g | Saturated Fat: 22g | Polyunsaturated Fat: 1g | Monounsaturated Fat: 4g | Trans Fat: 1g | Cholesterol: 64mg | Sodium: 237mg | Potassium: 293mg | Fiber: 4g | Sugar: 31g | Vitamin A: 471IU | Vitamin C: 0.002mg | Calcium: 92mg | Iron: 4mg

Nutrition information is automatically calculated, so should only be used as an approximation.

Classic Waffles

Classic Waffles

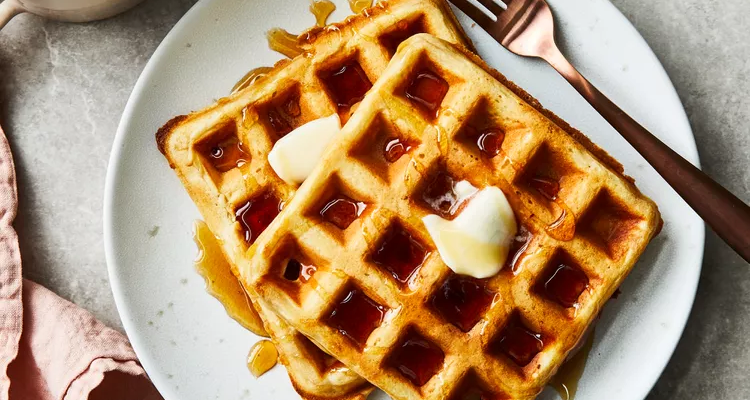
Classic Waffles are golden, crisp on the outside, and light and fluffy on the inside. Perfect for breakfast or brunch, they’re versatile enough to enjoy with syrup, fruit, or a sprinkle of powdered sugar simple, comforting, and timeless. Prep Time:10 minsCook Time:15 minsServings:5 Ingredients Directions 

Garlic Parmesan Knots

Garlic Parmesan Knots

Garlic Parmesan Knots are soft, buttery, and packed with savory flavor. Twisted into bite-sized knots and baked to golden perfection, they’re brushed with garlic and Parmesan for an irresistible appetizer or side that’s perfect for sharing or enjoying all on your own. Prep: 10minutes minutesCook: 10minutes minutesYield: 16 servings Ingredients Instructions

Chicken Paprikash

Chicken Paprikash

Chicken Paprikash is a comforting, classic Hungarian dish that’s rich, flavorful, and perfect for cozy dinners. Tender chicken simmers in a creamy, paprika-spiced sauce, creating a meal that’s hearty, satisfying, and full of warmth best served with noodles or dumplings to soak up every bit of the delicious sauce.

Recipe information

  • Total Time 2 hours 15 minutes
  • Yield 6 servings

Ingredients

1 Tbsp. Diamond Crystal or 1¾ tsp. Morton kosher salt, plus more

1 tsp. freshly ground pepper, plus more

3 lb. skin-on, bone-in chicken thighs and/or drumsticks (about 9 pieces), patted dry

1 Tbsp. vegetable oil

2 Tbsp. unsalted butter

2 large onions, thinly sliced

6 garlic cloves, finely grated

¼ cup Hungarian sweet paprika

1 Tbsp. all-purpose flour

½ tsp. cayenne pepper

2 cups low-sodium chicken broth

¼ cup sour cream

Parsley leaves with tender stems (for serving)

Buttered cooked egg noodles (for serving; optional)

Preparation

Step 1

Sprinkle 1 Tbsp. Diamond Crystal or 1¾ tsp. Morton kosher salt and 1 tsp. freshly ground pepper all over 3 lb. skin-on, bone-in chicken thighs and/or drumsticks (about 9 pieces), patted dry. Heat 1 Tbsp. vegetable oil in a medium Dutch oven or large high-sided skillet with a lid over medium-high. Working in batches if needed, cook chicken, skin side down, in a single layer, until golden brown, 5–7 minutes. Turn and cook on other side until golden brown, 5–7 minutes (chicken won’t be cooked all the way through at this point). Transfer to a large plate or baking sheet. Carefully pour off all but 1 Tbsp. fat from pot.

Step 2

Add 2 Tbsp. unsalted butter to pot and heat over medium-high until melted. Add 2 large onions, thinly sliced, and 6 garlic cloves, finely grated; cook, stirring often with a heatproof rubber spatula, until onions are softened and garlic is fragrant, 6–8 minutes. Add ¼ cup Hungarian sweet paprika, 1 Tbsp. all-purpose flour, and ½ tsp. cayenne pepper and cook, stirring constantly, until a thin film starts forming on bottom of pot, about 2 minutes. Gradually pour in 2 cups low-sodium chicken broth, stirring constantly. Bring to a simmer and cook until sauce is thick enough to lightly coat a spoon, about 3 minutes.

Step 3

Nestle chicken into sauce (they should be almost completely submerged) and cover pot. Reduce heat to low and cook 1 hour. Uncover pot and skim off excess fat; discard. Re-cover and continue to cook until chicken is tender and meat is falling off the bone, 30–35 minutes more. Transfer chicken to a platter.

Step 4

Increase heat to medium-high and bring sauce to a simmer. Cook, stirring occasionally, until thickened to the consistency of heavy cream, 6–8 minutes. Remove from heat and stir in ¼ cup sour cream. Taste sauce and season with more salt and pepper if needed. Spoon sauce over chicken, top with parsley leaves with tender stems, and serve with buttered cooked egg noodles if desired.

Note:

This chicken paprikash gets better with time, so feel free to make it ahead, store in the fridge for up to three days, and gently reheat on the stove.

Loukoumades

Loukoumades

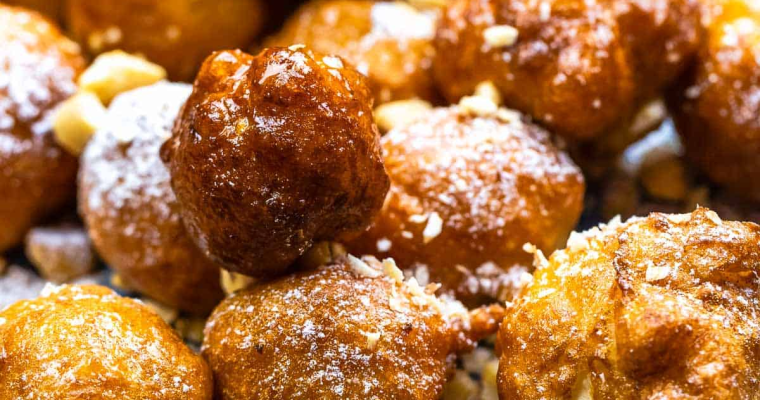
Loukoumades (Greek donuts with honey) are a delightful dessert made with a simple dough and a delicious honey syrup. This recipe makes 60 small donuts, so it’s great for sharing during special occasions and holidays. You can cut the dough ingredients in half if you