Tag: Desserts

Mini hasselbacks with soured cream, dill & pink pickled onions

Mini hasselbacks with soured cream, dill & pink pickled onions

Top these mini hasselbacks with soured cream, pink pickled onions and dill for easy finger food. They’re ideal for parties and buffets Ingredients: Directions: Nutrition per serving:

White chocolate fondue

White chocolate fondue

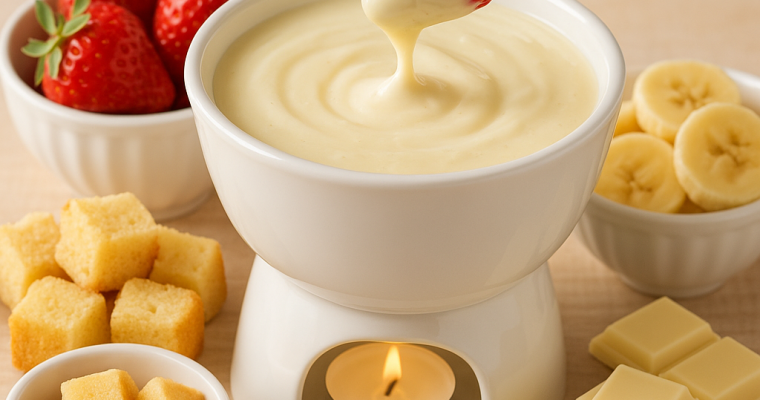
Divine white chocolate fondue in which to dip summer fruits Ingredients: Directions: Nutrition per serving:

Cranberry Orange Biscotti

Cranberry Orange Biscotti

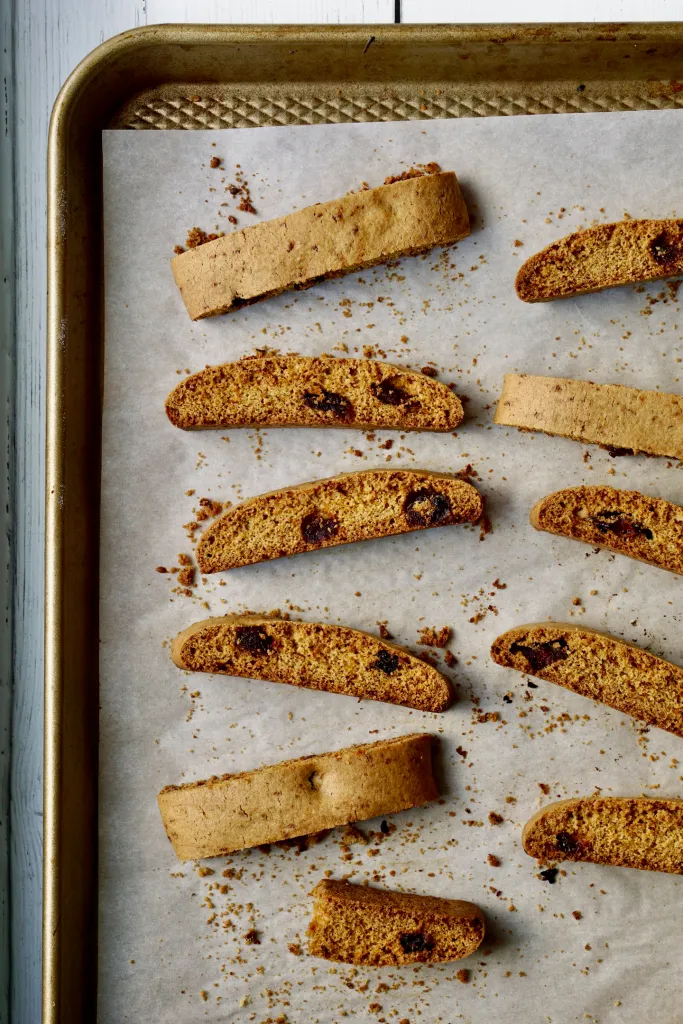
A healthy, whole-grain, low-sugar recipe for Cranberry Orange Biscotti with a cup of coffee to brighten up your afternoon break!…… It’s life.

Prep Time: 10 minutes mins
Cook Time: 30 minutes mins
Servings: 16 cookies

Ingredients

  • 1 large egg
  • 2 1/2 tbsp coconut oil melted, or other oil (37 g)
  • 1/4 cup coconut or other granulated sugar (48 g)
  • 1/2 tsp vanilla extract
  • 1 cup + 2 tbsp white whole wheat or all purpose flour (135 g)
  • 1 tsp baking powder
  • 1/4 cup dried cranberries (40 g)
  • orange zest (as much as you like)

Instructions

  • Preheat oven to 375F and line a cookie sheet with parchment.
  • In a medium bowl, beat oil, egg, sugar, vanilla until well blended.
  • Add your flour, make a well in the center and add baking powder, roughly stir the baking powder into the flour.
  • Add orange zest and stir all to form a heavy dough. If it’s still sticky add some more flour 1 tbsp (7g) at a time. Fold in cranberries.
  • Form a long roll of dough (use a lightly floured surface if it helps) and place on the cookie sheet.
  • Press down to about 1/2 inch thick.
  • Bake until golden brown about 20-25 minutes. Let the baked roll cool for a few minutes.
  • Slice into 16 and place the slices cut side up back on to the cookie sheet. Bake another 5-10 minutes until nicely toasted.
  • Let biscotti cool completely and enjoy!

Notes

We let our biscotti stay nice and crunchy in room temperature. They were consumed pretty quickly but I’ll bet they’ll stay fresh a few days at least!

For a milder more classical biscotti, use all purpose flour and white sugar. We loved the more “rustic” biscotti with the whole wheat flour and coconut sugar though!

Nutrition

Calories: 74kcal

Small-batch Chocolate Chip Tahini Biscotti

Small-batch Chocolate Chip Tahini Biscotti

Small-batch Chocolate Chip Tahini Biscotti a delightful twist on the classic biscotti, blending nutty tahini with melty pockets of chocolate in every crisp bite. The rich sesame flavor adds a subtle creaminess that perfectly complements the sweetness of the chocolate chips, making each piece both 

Chocolate Almond Biscotti

Chocolate Almond Biscotti

Chocolate Almond Biscotti crunchy, twice-baked perfection with a deep cocoa richness and the irresistible nuttiness of toasted almonds. Imagine dunking one into a steaming cup of velvety espresso, the crisp edges softening just enough to melt in your mouth. The chocolate lingers, the almonds add 

Blood orange & dark chocolate madeleines

Blood orange & dark chocolate madeleines

Best enjoyed warm from the oven, these delicate madeleines offer a perfect balance of rich dark chocolate and the vibrant, citrusy brightness of blood orange. Each shell-shaped bite is dipped in smooth chocolate and lightly dusted with blood orange powder, creating a dessert that’s both refined and irresistibly indulgent. Whether served at a dinner party or savored with a cup of tea, these madeleines are a treat that delights the senses.

Prep:50 mins
Cook:30 mins – plus overnight chilling
Serves: 20

Ingredients

  • 100g unsalted butter, plus extra for greasing
  • 2 large eggs
  • 100g golden caster sugar
  • zest 2 blood oranges plus juice of ½ (about 2 tbsp)
  • 100g plain flour, plus extra for dusting
  • 1 tsp baking powder
  • 140g dark chocolate (60-70% cocoa solids), finely chopped
  • blood orange dust (optional – see below)

Method

  1. Put the butter in a small saucepan over a medium heat until it foams and turns a nutty brown colour watch the pan carefully, as butter can burn quickly. Pour into a bowl and set aside to cool.
  2. Beat the eggs, sugar and zest in a large bowl with an electric hand whisk for about 5 mins until thick and pale. Add the juice and mix to combine. Mix the flour and baking powder together, then sift over the batter mixture, a third at a time, and fold in.
  3. Add a large spoonful of the batter to the butter, mixing together until smooth and combined. Pour this into the batter and gently fold together until fully combined. Press a sheet of cling film onto the surface of the mixture and chill overnight.
  4. About 30 mins before you want to bake the madeleines, grease a 12-hole madeleine tin with a little extra butter and dust with a little flour. Heat oven to 200C/180C fan/gas 6 and put the tin in the freezer to chill for 30 mins. Remove the batter from the fridge and add about 1 heaped tbsp to each madeleine hole – be careful not to overfill as they will bake over the edge and won’t form the characteristic hump. Depending on the size of your tin, you will have some batter left either bake in batches or put the rest back in the fridge and bake within three days.
  5. Bake in the oven for 10-12 mins or until golden brown around the edges. Immediately turn out the madeleines onto a wire rack and leave to cool fully. Put the chocolate in a microwaveable bowl and heat in the microwave on High in 30 sec bursts until about three-quarters of the chocolate has melted. Remove from the microwave and stir vigorously until the remaining chocolate has melted (this is a simple method of tempering and just ensures the chocolate will set properly at room temperature). Dip each madeleine halfway into the melted chocolate, allowing the excess to drip off, then place on a sheet of baking parchment. As the chocolate starts to set, but while still a little tacky, sprinkle with some of the Blood orange dust (below), if using, and allow to cool.

Tip

Blood orange dust

Use a vegetable peeler to remove the peel from 3 blood oranges, trying to take off as little pith as possible. Arrange on a baking tray lined with parchment and bake in the oven at its lowest temperature (around 60C/40C fan) for 1 1/2 – 2 hrs or until the peel is dry and curling up on itself, checking regularly. Allow to cool, then grind to a powder using a pestle and mortar or spice grinder. Will keep in a sealed jar for a few months add it to cakes or porridge for a flavour boost.

French Macaron

French Macaron

Pretty, delicate, and special, macarons are sure to impress. I love making my homemade macaron recipe for treats for the kids’ birthdays or when we have an occasion to celebrate because French macarons bring that WOW-factor to the table. Prep time: 30 minutesResting time: 30-60 minutesCook time: 

For a perfect pancake, avoid these 5 mistakes while preparing

For a perfect pancake, avoid these 5 mistakes while preparing

A pancake, also known as a hotcake, griddlecake, or flapjack, is a type of flat, frequently round, and thin cake that is made using a starch-based batter that may also include eggs, milk, and butter. It is baked on a hot griddle or frying pan. 

Classic Baltimore Rainbow Cake

Classic Baltimore Rainbow Cake

A rainbow cake is a multi-layered, vibrant cake that’s typically baked for weddings and other special events. The cake gets its name from the vivid colors it has, which are produced by incorporating food coloring into each layer’s batter. Typically, the colors of a rainbow consist of red, orange, yellow, green, blue, indigo, and violet. Classic Baltimore Rainbow cake can be adorned with sprinkles, fresh fruit, or other vibrant toppings. They are typically covered with whipped cream or buttercream icing in vibrant colors.

Classic Baltimore Rainbow Cake Ingredients

FOR THE CAKE
• 8 eggs
• 2 cups sugar
• 4 cups flour
• 4 teaspoons almond extract
• Food coloring in red, green, blue, yellow, or any four-color combination you choose
• 2 cups butter or margarine (divided into 1/2 cups and melted, cooled and reserved separately)
• 36 ounces raspberry jam or chocolate fudge frosting (recipe follows)
• Glaze for the top of the cake (recipe follows)

For The Chocolate Fudge Frosting

• 1 cup unsalted butter, softened
• 1 1/2 cups powdered sugar
• 1/3 cup unsweetened cocoa powder
• 2 to 3 tablespoons hot water
• 1/2 teaspoon vanilla extract
• Pinch of salt
• 8 ounces melted semisweet or dark chocolate, cooled

For The Glaze

• 1/3 cup butter or margarine
• 1/2 cup cocoa
• 1/3 cup milk
• 1 teaspoon vanilla extract
• 2 1/2 cups powdered sugar

Classic Baltimore Rainbow Cake Direction

FOR THE CAKE

  1. Preheat oven to 350 F.
  2. Four 10-by-15-inch jelly roll pans should be greased and lined with wax paper. Divide the ingredients for the batter into four equal parts and mix them separately.
  3. To make each layer, whisk together 1/2 cup sugar and 2 eggs in a mixing dish. Mix in one cup of flour, one teaspoon of almond essence, and a few food coloring drops. Beat for a duration of two minutes. Add 1/2 cup of the cooled, melted margarine and fold it in. Transfer the batter to the ready pan, making sure it covers every area. For twelve minutes, bake. Take out and place on a wire rack to cool. This forms the cake’s top layer.
  4. In the same manner, create the remaining three layers, using a different food coloring for each one.
  5. After the first layer cools, place it on a tray or piece of parchment paper. Spread with chocolate frosting or jam. Place the second layer on top of the first and gently press to fuse. Spread with chocolate frosting (recipe for frosting follows) or raspberry jam. Continue with the third and fourth layers, but for the top layer, spread the hot glaze (recipe follows) without using any jam or frosting.
  6. To assemble loaf cakes, cut into three equal pieces and coat the top and sides with glaze.

For The Chocolate Fudge Frosting

  1. Beat one cup of softened unsalted butter until smooth in a clean mixing basin. Add 2 to 3 tablespoons of boiling water, 1/2 teaspoon vanilla extract, 1/3 cup unsweetened cocoa, 1 1/2 cups powdered sugar, and a pinch of salt gradually. Stir until well blended.
  2. Add more hot water (a teaspoon at a time) if the frosting appears too thick to spread.
  3. Add 8 ounces of melted, cool dark, or semisweet chocolate and stir until well blended. (If the frosting still looks too runny, put it in the fridge for ten to fifteen minutes, or until you’re ready to assemble the cake layers.) Yields roughly 1 1/2 cups.

For The Glaze

  1. Melt 1/3 cup butter or margarine in a saucepan, then mix in 1/2 cup cocoa. Simmer for one minute.
  2. Take off the heat and mix in 2 1/2 cups powdered sugar, 1/3 cup milk, and 1 teaspoon vanilla essence. Blend until a smooth consistency is achieved.
  3. While the cake is still hot, spread. Let the glaze cool and solidify before slicing.
French Silk Pie

French Silk Pie

Traditionally served chilled or at room temperature, French silk pie is a popular dessert loved by many. It is a very creamy and chocolaty pie, a very popular offering in pie shops. This pie is extremely easy to make at home. Very suitable for parties